github.com/oobabooga/textgen @v4.9 sqlite
README
Special thanks to:
Warp, built for coding with multiple AI agents
Available for macOS, Linux, & Windows
TextGen
A desktop app for local LLMs. Open source, no telemetry. Text, vision, tool-calling, web search. UI + API.

Get started in 1 minute
Download, unzip, double-click textgen. A window opens.
https://github.com/oobabooga/textgen/releases
Portable builds for Linux, Windows, and macOS with CUDA, Vulkan, ROCm, and CPU-only options. All dependencies included. Compatible with GGUF (llama.cpp) models.
For additional backends (ExLlamaV3, Transformers), training, image generation, and extensions, see Installation.
Features
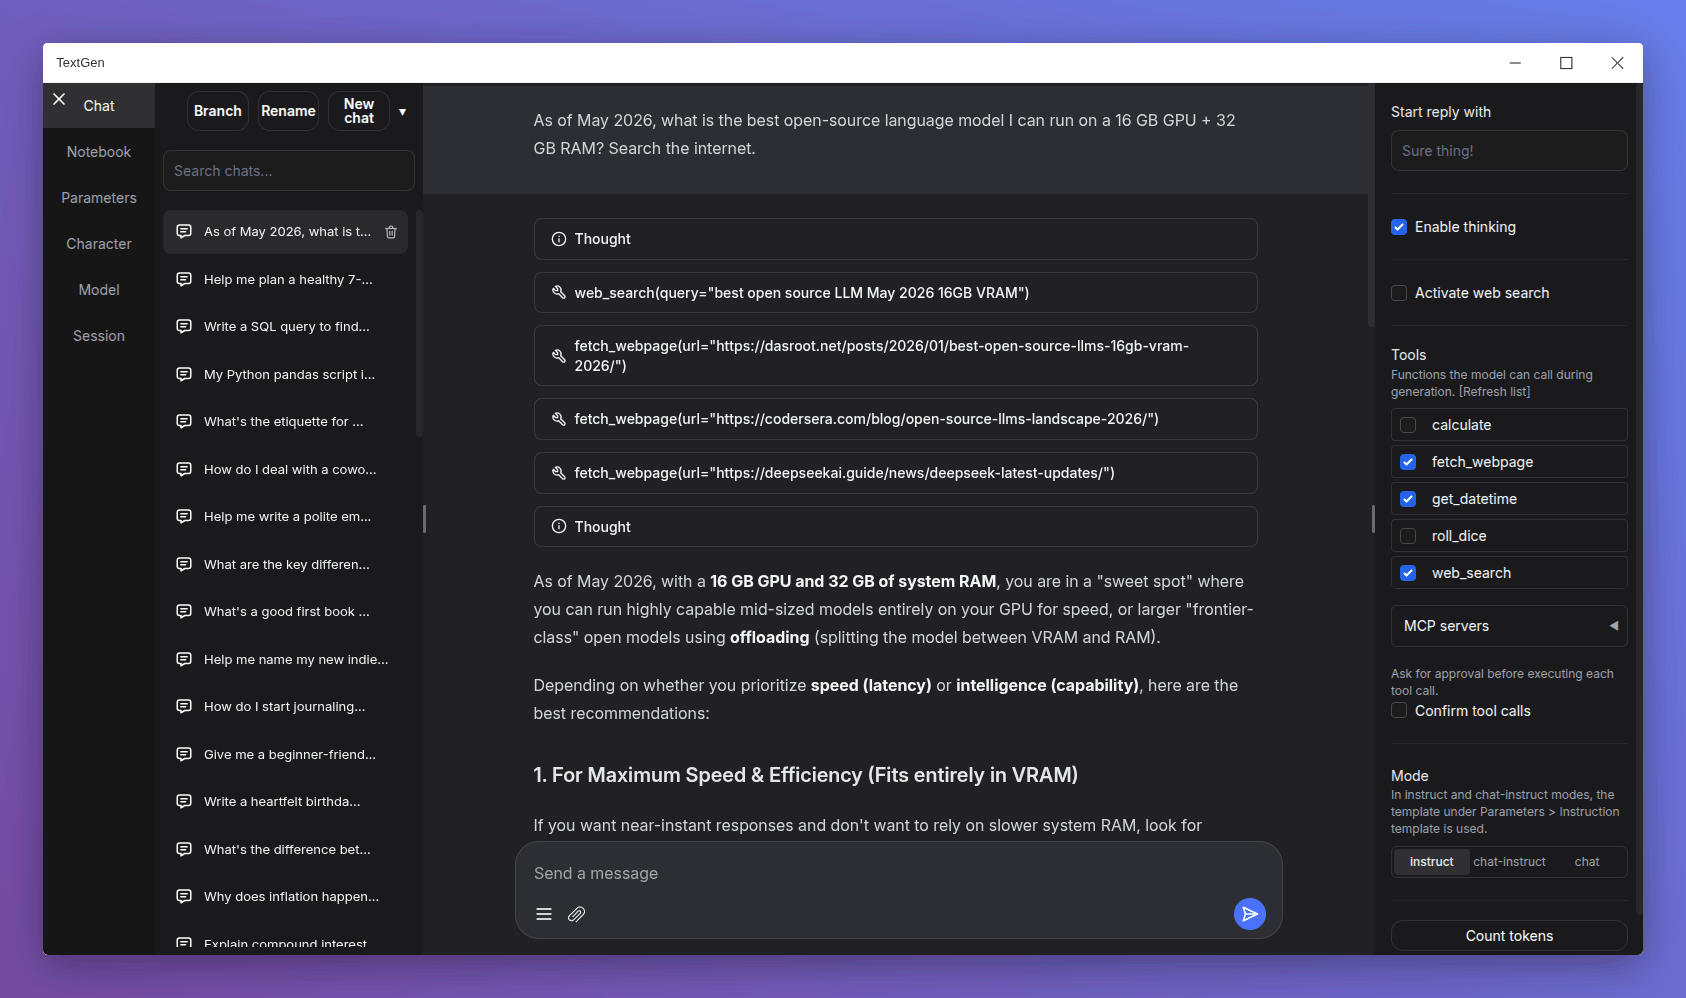
Chat & generation
instructmode for instruction-following (like ChatGPT), andchat-instruct/chatmodes for talking to custom characters. Prompts are automatically formatted with Jinja2 templates.- Vision (multimodal): Attach images to messages for visual understanding (tutorial).
- File attachments: Upload text files, PDF documents, and .docx documents to talk about their contents.
- Edit messages, navigate between message versions, and branch conversations at any point.
- Notebook tab for free-form text generation outside of chat turns.
Backends & API
- Multiple backends: llama.cpp, ik_llama.cpp, Transformers, ExLlamaV3, and TensorRT-LLM. Switch between backends and models without restarting.
- OpenAI/Anthropic-compatible API: Chat, Completions, and Messages endpoints with tool-calling support. Use as a local drop-in replacement for the OpenAI/Anthropic APIs (examples).
- Tool-calling: Models can call custom functions during chat, including web search, page fetching, and math. Each tool is a single
.pyfile. MCP servers are also supported (tutorial).
Training & image generation
- Training: Fine-tune LoRAs on multi-turn chat or raw text datasets. Supports resuming interrupted runs (tutorial).
- Image generation: A dedicated tab for
diffusersmodels like Z-Image-Turbo. Features 4-bit/8-bit quantization and a persistent gallery with image metadata (tutorial).
Privacy & interface
- 100% offline and private, with zero telemetry, external resources, or remote update requests.
- Dark/light themes, syntax highlighting for code blocks, and LaTeX rendering for mathematical expressions.
- Built-in and community extensions including TTS, voice input, and translation. See the extensions directory for the full list.
Downloading models
- Download a GGUF model file from Hugging Face.
- Place it in the
user_data/modelsfolder.
That's it. The UI will detect it automatically.
For recommended GGUF quants, check out LocalBench. To estimate how much memory a model will use, try the GGUF Memory Calculator.
Other model types (Transformers, EXL3)
Models that consist of multiple files (like 16-bit Transformers models and EXL3 models) should be placed in a subfolder inside user_data/models:
textgen
└── user_data
    └── models
        └── Qwen_Qwen3-8B
            ├── config.json
            ├── generation_config.json
            ├── model-00001-of-00004.safetensors
            ├── ...
            ├── tokenizer_config.json
            └── tokenizer.json
These formats require the full installation (not the portable build).
Installation
For the desktop app, see the portable builds. The options below run the web UI in your browser instead.
Manual portable install with venv
Fast setup on any Python 3.9+:
# Clone repository
git clone https://github.com/oobabooga/textgen
cd textgen

# Create virtual environment
python -m venv venv

# Activate virtual environment
# On Windows:
venv\Scripts\activate
# On macOS/Linux:
source venv/bin/activate

# Install dependencies (choose appropriate file under requirements/portable for your hardware)
pip install -r requirements/portable/requirements.txt --upgrade

# Launch server (basic command)
python server.py --portable --api --auto-launch

# When done working, deactivate
deactivate
Full installation
For users who need additional backends (ExLlamaV3, Transformers), training, image generation, or extensions like TTS, voice input, and translation. Requires ~10GB disk space and downloads PyTorch.
Installation details
One-click installer
- Clone the repository, or download its source code and extract it.
- Run the startup script for your OS:
start_windows.bat,start_linux.sh, orstart_macos.sh. - When prompted, select your GPU vendor.
- After installation, open
http://127.0.0.1:7860in your browser.
After installation:
- Restart: run the same
start_script. - Pass command-line flags: directly (e.g.,
./start_linux.sh --help), or persist them inuser_data/CMD_FLAGS.txt(e.g.,--apito enable the API). - Update: run the update script for your OS (
update_wizard_windows.bat,update_wizard_linux.sh, orupdate_wizard_macos.sh). - Reinstall from scratch: delete the
installer_filesfolder and run thestart_script again. - Install extension requirements: use the update wizard's "Install/update extensions requirements" option. It reinstalls the main project requirements at the end to ensure they take precedence over conflicting extension dependencies.
Notes:
- These scripts (
start_,update_wizard_,cmd_) don't need to run as admin/root. - For automated installation, set the
GPU_CHOICE,LAUNCH_AFTER_INSTALL, andINSTALL_EXTENSIONSenvironment variables. Example:GPU_CHOICE=A LAUNCH_AFTER_INSTALL=FALSE INSTALL_EXTENSIONS=TRUE ./start_linux.sh. - Under the hood, the script uses Miniforge to set up a Conda environment in
installer_files/. To run anything manually in this environment, launch an interactive shell usingcmd_linux.sh,cmd_windows.bat, orcmd_macos.sh.
Full installation with Conda
0. Install Conda
https://github.com/conda-forge/miniforge
On Linux or WSL, Miniforge can be automatically installed with these two commands:
curl -sL "https://github.com/conda-forge/miniforge/releases/latest/download/Miniforge3-Linux-x86_64.sh" > "Miniforge3.sh"
bash Miniforge3.sh
For other platforms, download from: https://github.com/conda-forge/miniforge/releases/latest
1. Create a new conda environment
conda create -n textgen python=3.13
conda activate textgen
2. Install Pytorch
| System | GPU | Command |
|---|---|---|
| Linux/WSL | NVIDIA | pip3 install torch==2.9.1 --index-url https://download.pytorch.org/whl/cu128 |
| Linux/WSL | CPU only | pip3 install torch==2.9.1 --index-url https://download.pytorch.org/whl/cpu |
| Linux | AMD | pip3 install https://repo.radeon.com/rocm/manylinux/rocm-rel-7.2/torch-2.9.1%2Brocm7.2.0.lw.git7e1940d4-cp313-cp313-linux_x86_64.whl |
| MacOS + MPS | Any | pip3 install torch==2.9.1 |
| Windows | NVIDIA | pip3 install torch==2.9.1 --index-url https://download.pytorch.org/whl/cu128 |
| Windows | CPU only | pip3 install torch==2.9.1 |
The up-to-date commands can be found here: https://pytorch.org/get-started/locally/.
If you need nvcc to compile some library manually, you will additionally need to install this:
conda install -y -c "nvidia/label/cuda-12.8.1" cuda
3. Install the web UI
git clone https://github.com/oobabooga/textgen
cd textgen
pip install -r requirements/full/<requirements file according to table below>
Requirements file to use:
| GPU | requirements file to use |
|---|---|
| NVIDIA | requirements.txt |
| AMD | requirements_amd.txt |
| CPU only | requirements_cpu_only.txt |
| Apple Intel | requirements_apple_intel.txt |
| Apple Silicon | requirements_apple_silicon.txt |
4. Start the web UI
conda activate textgen
cd textgen
python server.py
Then browse to http://127.0.0.1:7860.
Manual compilation
The requirements*.txt files above contain wheels precompiled through GitHub Actions. To compile manually (e.g., if no wheels are available for your hardware), use requirements_nowheels.txt and install your desired loaders manually.
Updating the requirements
From time to time, the requirements*.txt files change. To update:
conda activate textgen
cd textgen
pip install -r <requirements file that you have used> --upgrade
Docker
For NVIDIA GPU:
ln -s docker/{nvidia/Dockerfile,nvidia/docker-compose.yml,.dockerignore} .
For AMD GPU:
ln -s docker/{amd/Dockerfile,amd/docker-compose.yml,.dockerignore} .
For Intel GPU:
ln -s docker/{intel/Dockerfile,intel/docker-compose.yml,.dockerignore} .
For CPU only
ln -s docker/{cpu/Dockerfile,cpu/docker-compose.yml,.dockerignore} .
cp docker/.env.example .env
#Create logs/cache dir :
mkdir -p user_data/logs user_data/cache
# Edit .env and set:
#   TORCH_CUDA_ARCH_LIST based on your GPU model
#   APP_RUNTIME_GID      your host user's group id (run `id -g` in a terminal)
#   BUILD_EXTENIONS      optionally add comma separated list of extensions to build
# Edit user_data/CMD_FLAGS.txt and add in it the options you want to execute (like --listen --cpu)
#
docker compose up --build
- You need to have Docker Compose v2.17 or higher installed. See this guide for instructions.
- For additional docker files, check out this repository.
Command-line flags
Show full list
```txt usage: server.py [-h] [--user-data-dir USER_DATA_DIR] [--multi-user] [--model MODEL] [--lora LORA [LORA ...]] [--model-dir MODEL_DIR] [--lora-dir LORA_DIR] [--model-menu] [--settings SETTINGS] [--extensions EXTENSIONS [EXTENSIONS ...]] [--verbose] [--idle-timeout IDLE_TIMEOUT] [--image-model IMAGE_MODEL] [--image-model-dir IMAGE_MODEL_DIR] [--image-dtype {bfloat16,float16}] [--image-attn-backend {flash_attention_2,sdpa}] [--image-cpu-offload] [--image-compile] [--image-quant {none,bnb-8bit,bnb-4bit,torchao-int8wo,torchao-fp4,torchao-float8wo}] [--loader LOADER] [--ctx-size N] [--cache-type N] [--model-draft MODEL_DRAFT] [--draft-max DRAFT_MAX] [--gpu-layers-draft GPU_LAYERS_DRAFT] [--device-draft DEVICE_DRAFT] [--ctx-size-draft CTX_SIZE_DRAFT] [--spec-type {none,ngram-mod,ngram-simple,ngram-map-k,ngram-map-k4v,ngram-cache}] [--spec-ngram-size-n SPEC_NGRAM_SIZE_N] [--spec-ngram-size-m SPEC_NGRAM_SIZE_M] [--spec-ngram-min-hits SPEC_NGRAM_MIN_HITS] [--gpu-layers N] [--cpu-moe] [--mmproj MMPROJ] [--streaming-llm] [--tensor-split TENSOR_SPLIT] [--split-mode {layer,row,tensor,none}] [--no-mmap] [--mlock] [--no-kv-offload] [--batch-size BATCH_SIZE] [--ubatch-size UBATCH_SIZE] [--threads THREADS] [--threads-batch THREADS_BATCH] [--numa] [--parallel PARALLEL] [--fit-target FIT_TARGET] [--extra-flags EXTRA_FLAGS] [--ik] [--cpu] [--cpu-memory CPU_MEMORY] [--disk] [--disk-cache-dir DISK_CACHE_DIR] [--load-in-8bit] [--bf16] [--no-cache] [--trust-remote-code] [--force-safetensors] [--no_use_fast] [--attn-implementation IMPLEMENTATION] [--load-in-4bit] [--use_double_quant] [--compute_dtype COMPUTE_DTYPE] [--quant_type QUANT_TYPE] [--gpu-split GPU_SPLIT] [--enable-tp] [--tp-backend TP_BACKEND] [--cfg-cache] [--listen] [--listen-port LISTEN_PORT] [--listen-host LISTEN_HOST] [--share] [--auto-launch] [--gradio-auth GRADIO_AUTH] [--gradio-auth-path GRADIO_AUTH_PATH] [--ssl-keyfile SSL_KEYFILE] [--ssl-certfile SSL_CERTFILE] [--subpath SUBPATH] [--old-colors] [--portable] [--api] [--public-api] [--public-api-id PUBLIC_API_ID] [--api-port API_PORT] [--api-key API_KEY] [--admin-key ADMIN_KEY] [--api-enable-ipv6] [--api-disable-ipv4] [--nowebui] [--temperature N] [--dynatemp-low N] [--dynatemp-high N] [--dynatemp-exponent N] [--smoothing-factor N] [--smoothing-curve N] [--top-p N] [--top-k N] [--min-p N] [--top-n-sigma N] [--typical-p N] [--xtc-threshold N] [--xtc-probability N] [--epsilon-cutoff N]
Core symbols most depended-on inside this repo
gradioShape
Languages
Modules by API surface
Dependencies from manifests, versioned
For agents
$ claude mcp add textgen \
  -- python -m otcore.mcp_server <graph>