github.com/brycedrennan/imaginAIry @15.0.0
README
ImaginAIry 🤖🧠
![]()

AI imagined images. Pythonic generation of stable diffusion images and videos *!.
"just works" on Linux and macOS(M1) (and sometimes windows).
# on macOS, make sure rust is installed first
# be sure to use Python 3.10, Python 3.11 is not supported at the moment
>> pip install imaginairy
>> imagine "a scenic landscape" "a photo of a dog" "photo of a fruit bowl" "portrait photo of a freckled woman" "a bluejay"
# Make an AI video
>> aimg videogen --start-image rocket.png
Stable Video Diffusion


Rushed release of Stable Diffusion Video!
Works with Nvidia GPUs. Does not work on Mac or CPU.
On Windows you'll need to install torch 2.0 first via https://pytorch.org/get-started/locally/
Usage: aimg videogen [OPTIONS]

  AI generate a video from an image

  Example:

      aimg videogen --start-image assets/rocket-wide.png

Options:
  --start-image TEXT       Input path for image file.
  --num-frames INTEGER     Number of frames.
  --num-steps INTEGER      Number of steps.
  --model TEXT             Model to use. One of: svd, svd_xt, svd_image_decoder, svd_xt_image_decoder
  --fps INTEGER            FPS for the AI to target when generating video
  --output-fps INTEGER     FPS for the output video
  --motion-amount INTEGER  How much motion to generate. value between 0 and 255.
  -r, --repeats INTEGER    How many times to repeat the renders.   [default: 1]
  --cond-aug FLOAT         Conditional augmentation.
  --seed INTEGER           Seed for random number generator.
  --decoding_t INTEGER     Number of frames decoded at a time.
  --output_folder TEXT     Output folder.
  --help                   Show this message and exit.
Images


Whats New
14.3.0 - feature: integrates spandrel for upscaling - fix: allow loading sdxl models from local paths.
14.2.0
- 🎉 feature: add image prompt support via --image-prompt and --image-prompt-strength
14.1.1 - tests: add installation tests for windows, mac, and conda - fix: dependency issues
14.1.0 - 🎉 feature: make video generation smooth by adding frame interpolation - feature: SDXL weights in the compvis format can now be used - feature: allow video generation at any size specified by user - feature: video generations output in "bounce" format - feature: choose video output format: mp4, webp, or gif - feature: fix random seed handling in video generation - docs: auto-publish docs on push to master - build: remove imageio dependency - build: vendorize facexlib so we don't install its unneeded dependencies
14.0.4 - docs: add a documentation website at https://brycedrennan.github.io/imaginAIry/ - build: remove fairscale dependency - fix: video generation was broken
14.0.3 - fix: several critical bugs with package - tests: add a wheel smoketest to detect these issues in the future
14.0.0
- 🎉 video generation using Stable Video Diffusion
- add --videogen to any image generation to create a short video from the generated image
- or use aimg videogen to generate a video from an image
- 🎉 SDXL (Stable Diffusion Extra Large) models are now supported.
- try --model opendalle or --model sdxl
- inpainting and controlnets are not yet supported for SDXL
- 🎉 imaginairy is now backed by the refiners library
- This was a huge rewrite which is why some features are not yet supported. On the plus side, refiners supports
cutting edge features (SDXL, image prompts, etc) which will be added to imaginairy soon.
- self-attention guidance which makes details of images more accurate
- 🎉 feature: larger image generations now work MUCH better and stay faithful to the same image as it looks at a smaller size.
For example --size 720p --seed 1 and --size 1080p --seed 1 will produce the same image for SD15
- 🎉 feature: loading diffusers based models now supported. Example --model https://huggingface.co/ainz/diseny-pixar --model-architecture sd15
- 🎉 feature: qrcode controlnet!
Run API server and StableStudio web interface (alpha)
Generate images via API or web interface. Much smaller featureset compared to the command line tool.
>> aimg server
Visit http://localhost:8000/ and http://localhost:8000/docs
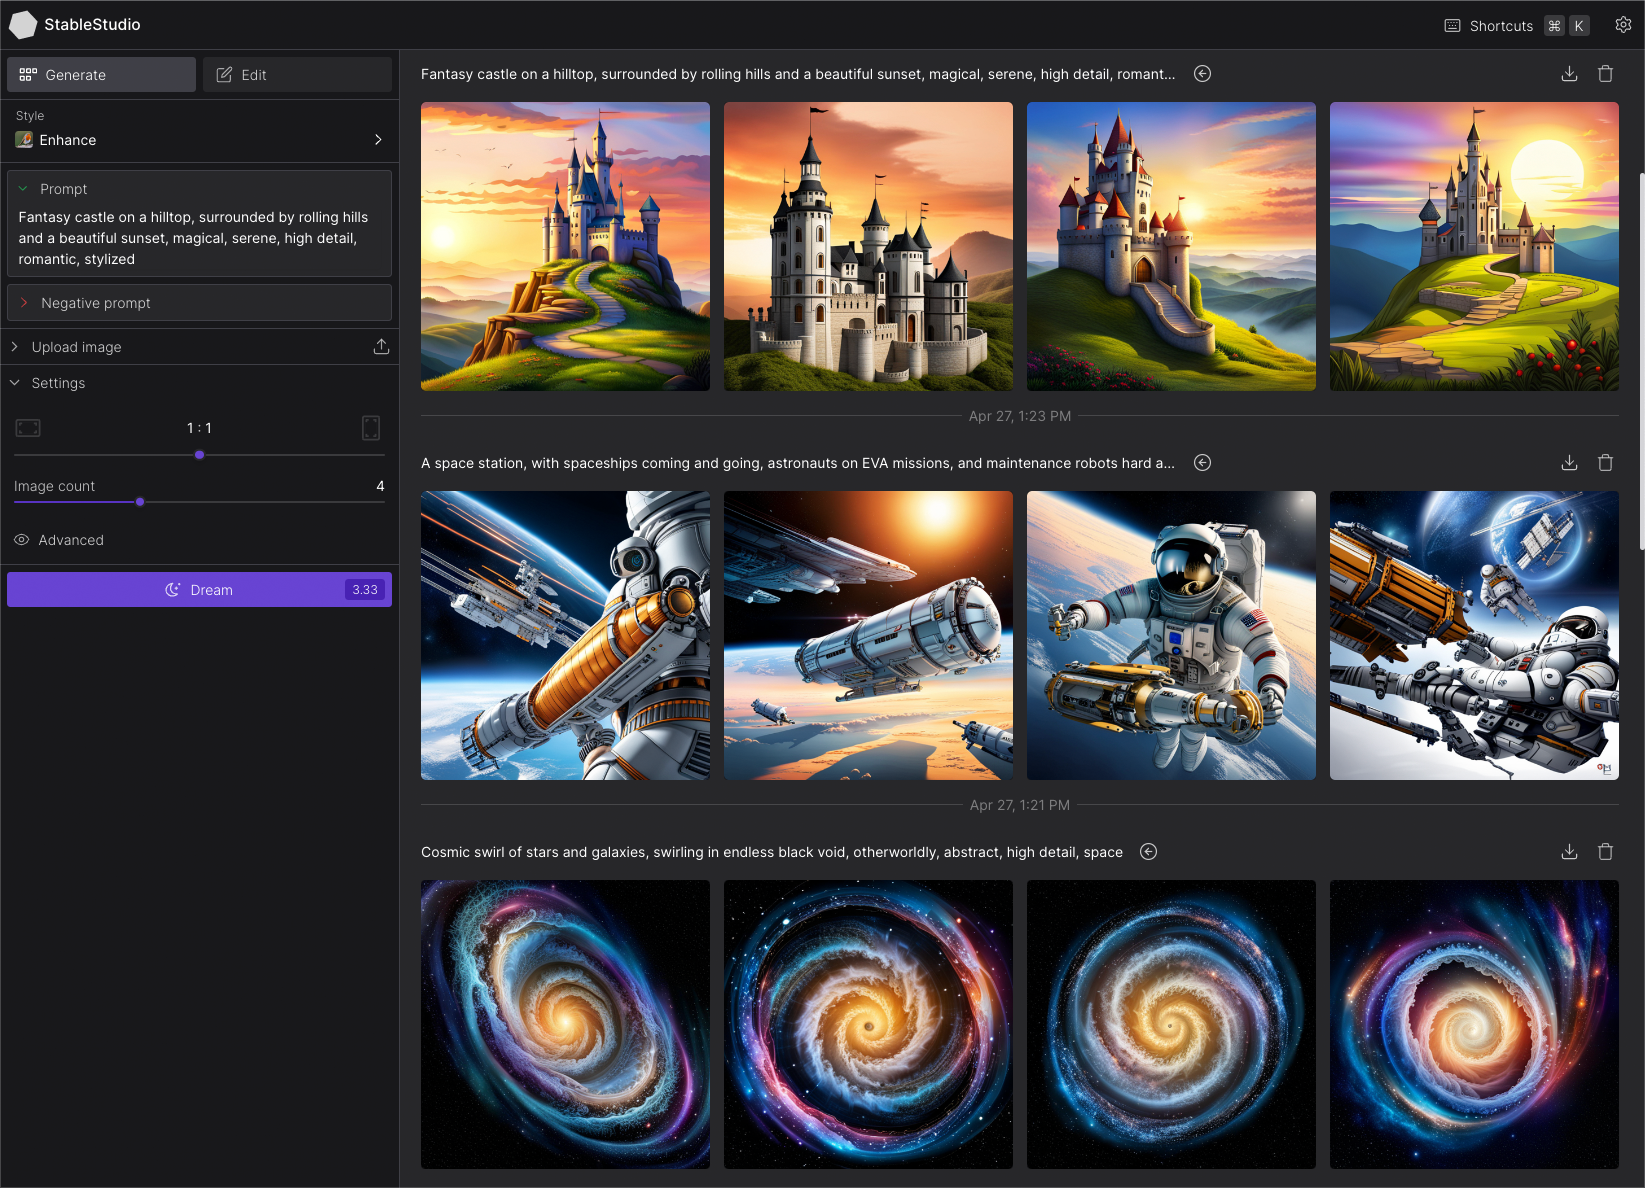
Image Structure Control by ControlNet
(Not supported for SDXL yet)
Generate images guided by body poses, depth maps, canny edges, hed boundaries, or normal maps.
Openpose Control
imagine --control-image assets/indiana.jpg --control-mode openpose --caption-text openpose "photo of a polar bear"
<img src="https://github.com/brycedrennan/imaginAIry/raw/15.0.0/docs/assets/indiana.jpg" height="256">
<img src="https://github.com/brycedrennan/imaginAIry/raw/15.0.0/docs/assets/indiana-pose.jpg" height="256">
<img src="https://github.com/brycedrennan/imaginAIry/raw/15.0.0/docs/assets/indiana-pose-polar-bear.jpg" height="256">
Canny Edge Control
imagine --control-image assets/lena.png --control-mode canny "photo of a woman with a hat looking at the camera"
<img src="https://github.com/brycedrennan/imaginAIry/raw/15.0.0/docs/assets/lena.png" height="256">
<img src="https://github.com/brycedrennan/imaginAIry/raw/15.0.0/docs/assets/lena-canny.jpg" height="256">
<img src="https://github.com/brycedrennan/imaginAIry/raw/15.0.0/docs/assets/lena-canny-generated.jpg" height="256">
HED Boundary Control
imagine --control-image dog.jpg --control-mode hed "photo of a dalmation"
<img src="https://github.com/brycedrennan/imaginAIry/raw/15.0.0/docs/assets/000032_337692011_PLMS40_PS7.5_a_photo_of_a_dog.jpg" height="256">
<img src="https://github.com/brycedrennan/imaginAIry/raw/15.0.0/docs/assets/dog-hed-boundary.jpg" height="256">
<img src="https://github.com/brycedrennan/imaginAIry/raw/15.0.0/docs/assets/dog-hed-boundary-dalmation.jpg" height="256">
Depth Map Control
imagine --control-image fancy-living.jpg --control-mode depth "a modern living room"
<img src="https://github.com/brycedrennan/imaginAIry/raw/15.0.0/docs/assets/fancy-living.jpg" height="256">
<img src="https://github.com/brycedrennan/imaginAIry/raw/15.0.0/docs/assets/fancy-living-depth.jpg" height="256">
<img src="https://github.com/brycedrennan/imaginAIry/raw/15.0.0/docs/assets/fancy-living-depth-generated.jpg" height="256">
Normal Map Control
imagine --control-image bird.jpg --control-mode normal "a bird"
<img src="https://github.com/brycedrennan/imaginAIry/raw/15.0.0/docs/assets/013986_1_kdpmpp2m59_PS7.5_a_bluejay_[generated].jpg" height="256">
<img src="https://github.com/brycedrennan/imaginAIry/raw/15.0.0/docs/assets/bird-normal.jpg" height="256">
<img src="https://github.com/brycedrennan/imaginAIry/raw/15.0.0/docs/assets/bird-normal-generated.jpg" height="256">
Image Shuffle Control
Generates the image based on elements of the control image. Kind of similar to style transfer.
imagine --control-image pearl-girl.jpg --control-mode shuffle "a clown"
The middle image is the "shuffled" input image
<img src="https://github.com/brycedrennan/imaginAIry/raw/15.0.0/docs/assets/girl_with_a_pearl_earring.jpg" height="256">
<img src="https://github.com/brycedrennan/imaginAIry/raw/15.0.0/docs/assets/pearl_shuffle_019331_1_kdpmpp2m15_PS7.5_img2img-0.0_a_clown.jpg" height="256">
<img src="https://github.com/brycedrennan/imaginAIry/raw/15.0.0/docs/assets/pearl_shuffle_clown_019331_1_kdpmpp2m15_PS7.5_img2img-0.0_a_clown.jpg" height="256">
Editing Instructions Control
Similar to instructPix2Pix (below) but works with any SD 1.5 based model.
imagine --control-image pearl-girl.jpg --control-mode edit --init-image-strength 0.01 --steps 30 --negative-prompt "" --model openjourney-v2 "make it anime" "make it at the beach"
<img src="https://github.com/brycedrennan/imaginAIry/raw/15.0.0/docs/assets/girl_with_a_pearl_earring.jpg" height="256">
<img src="https://github.com/brycedrennan/imaginAIry/raw/15.0.0/docs/assets/pearl_anime_019537_521829407_kdpmpp2m30_PS9.0_img2img-0.01_make_it_anime.jpg" height="256">
<img src="https://github.com/brycedrennan/imaginAIry/raw/15.0.0/docs/assets/pearl_beach_019561_862735879_kdpmpp2m30_PS7.0_img2img-0.01_make_it_at_the_beach.jpg" height="256">
Add Details Control (upscaling/super-resolution)
Replaces existing details in an image. Good to use with --init-image-strength 0.2
imagine --control-image "assets/wishbone.jpg" --control-mode details "sharp focus, high-resolution" --init-image-strength 0.2 --steps 30 -w 2048 -h 2048
<img src="https://github.com/brycedrennan/imaginAIry/raw/15.0.0/docs/assets/wishbone_headshot_badscale.jpg" height="256">
<img src="https://github.com/brycedrennan/imaginAIry/raw/15.0.0/docs/assets/wishbone_headshot_details.jpg" height="256">
Image (re)Colorization (using brightness control)
Colorize black and white images or re-color existing images.
The generated colors will be applied back to the original image. You can either provide a caption or allow the tool to generate one for you.
aimg colorize pearl-girl.jpg --caption "photo of a woman"
<img src="https://github.com/brycedrennan/imaginAIry/raw/15.0.0/docs/assets/girl_with_a_pearl_earring.jpg" height="256">
<img src="https://github.com/brycedrennan/imaginAIry/raw/15.0.0/docs/assets/pearl-gray.jpg" height="256">
<img src="https://github.com/brycedrennan/imaginAIry/raw/15.0.0/docs/assets/pearl-recolor-a.jpg" height="256">
Instruction based image edits by InstructPix2Pix
(Broken as of 14.0.0)
Just tell imaginairy how to edit the image and it will do it for you!


Click to see shell commands
Use prompt strength to control how strong the edit is. For extra control you can combine with prompt-based masking.
# enter imaginairy shell
>> aimg
🤖🧠> edit scenic_landscape.jpg -p "make it winter" --prompt-strength 20
🤖🧠> edit dog.jpg -p "make the dog red" --prompt-strength 5
🤖🧠> edit bowl_of_fruit.jpg -p "replace the fruit with strawberries"
🤖🧠> edit freckled_woman.jpg -p "make her a cyborg" --prompt-strength 13
🤖🧠> edit bluebird.jpg -p "make the bird wear a cowboy hat" --prompt-strength 10
🤖🧠> edit flower.jpg -p "make the flower out of paper origami" --arg-schedule prompt-strength[1:11:0.3]  --steps 25 --compilation-anim gif

# create a comparison gif
🤖🧠> edit pearl_girl.jpg -p "make her wear clown makeup" --compare-gif
# create an animation showing the edit with increasing prompt strengths
🤖🧠> edit mona-lisa.jpg -p "make it a color professional photo headshot" --negative-prompt "old, ugly, blurry" --arg-schedule "prompt-strength[2:8:0.5]" --compilation-anim gif
🤖🧠> edit gg-bridge.jpg -p "make it night time" --prompt-strength 15  --steps 30 --arg-schedule prompt-strength[1:15:1] --compilation-anim gif
Quick Image Edit Demo
Want just quickly have some fun? Try edit-demo to apply some pre-defined edits.
>> aimg edit-demo pearl_girl.jpg


Prompt Based Masking by clipseg
Specify advanced text based masks using boolean logic and strength modifiers.
Mask syntax:
- mask descriptions must be lowercase
- keywords (AND, OR, NOT) must be uppercase
- parentheses are supported
- mask modifiers may be appended to any mask or group of masks. Example: (dog OR cat){+5} means that we'll
select any dog or cat and then expand the size of the mask area by 5 pixels. Valid mask modifiers:
- {+n} - expand mask by n pixels
- {-n} - shrink mask by n pixels
- {*n} - multiply mask strength. will expand mask to areas that weakly matched the mask description
- {/n} - divide mask strength. will reduce mask to areas that most strongly matched the mask description. probably not useful
When writing strength modifiers keep in mind that pixel values are between 0 and 1.
```bash
imagine \ --init-image pearl_earring.jpg \ --mask-prompt "face AND NOT (bandana OR hair OR blue fabric){*6}" \ --
Core symbols most depended-on inside this repo
appendShape
Languages
Modules by API surface
Dependencies from manifests, versioned
For agents
$ claude mcp add imaginAIry \
  -- python -m otcore.mcp_server <graph>