github.com/bee-queue/bee-queue @v2.0.0 sqlite
README
 [![npm Version][npm-image]][npm-url]
 ![]() [![Coverage Status][coveralls-image]][coveralls-url]
[![Coverage Status][coveralls-image]][coveralls-url]
A simple, fast, robust job/task queue for Node.js, backed by Redis.
- Simple: ~1000 LOC, and minimal dependencies.
- Fast: maximizes throughput by minimizing Redis and network overhead. Benchmarks well.
- Robust: designed with concurrency, atomicity, and failure in mind; full code coverage.
const Queue = require('bee-queue');
const queue = new Queue('example');

const job = queue.createJob({x: 2, y: 3});
job.save();
job.on('succeeded', (result) => {
  console.log(`Received result for job ${job.id}: ${result}`);
});

// Process jobs from as many servers or processes as you like
queue.process(function (job, done) {
  console.log(`Processing job ${job.id}`);
  return done(null, job.data.x + job.data.y);
});
Introduction
Bee-Queue is meant to power a distributed worker pool and was built with short, real-time jobs in mind. A web server can enqueue a job, wait for a worker process to complete it, and return its results within an HTTP request. Scaling is as simple as running more workers.
Thanks to the folks at Mixmax, Bee-Queue is once again being regularly maintained!
Celery, Resque, Kue, and Bull operate similarly, but are generally designed for longer background jobs, supporting things like job prioritization and repeatable jobs, which Bee-Queue currently does not. Bee-Queue can handle longer background jobs just fine, but they aren't the primary focus.
- Create, save, and process jobs
- Concurrent processing
- Job timeouts, retries, and retry strategies
- Scheduled jobs
- Pass events via Pub/Sub
- Progress reporting
- Send job results back to producers
- Robust design
- Strives for all atomic operations
- Retries stuck jobs for at-least-once delivery
- High code coverage
- Performance-focused
- Minimizes Redis usage
- Uses Lua scripting and pipelining to minimize network overhead
- Benchmarks favorably against similar libraries
- Fully callback- and Promise-compatible API
Installation
$ npm install bee-queue
You'll also need Redis 2.8+* running somewhere.
* We've been noticing that some jobs get delayed by virtue of an issue with Redis < 3.2, and therefore recommend the use of Redis 3.2+.
Table of Contents
- Motivation
- Benchmarks
- Web Interface
- Overview
- Creating Queues
- Creating Jobs
- Processing Jobs
- Progress Reporting
- Job & Queue Events
- Stalling Jobs
- Optimizing Redis Connections
- API Reference
- Under The Hood
- Contributing
- License
Motivation
Celery is for Python, and Resque is for Ruby, but Kue and Bull already exist for Node, and they're good at what they do, so why does Bee-Queue also need to exist?
In short: we needed to mix and match things that Kue does well with things that Bull does well, and we needed to squeeze out more performance. There's also a long version with more details.
Bee-Queue starts by combining Bull's simplicity and robustness with Kue's ability to send events back to job creators, then focuses heavily on minimizing overhead, and finishes by being strict about code quality and testing. It compromises on breadth of features, so there are certainly cases where Kue or Bull might be preferable (see Contributing).
Bull and Kue do things really well and deserve a lot of credit. Bee-Queue borrows ideas from both, and Bull was an especially invaluable reference during initial development.
Why Bees?
Bee-Queue is like a bee because it:
- is small and simple
- is fast (bees can fly 20mph!)
- carries pollen (messages) between flowers (servers)
- something something "worker bees"
Benchmarks
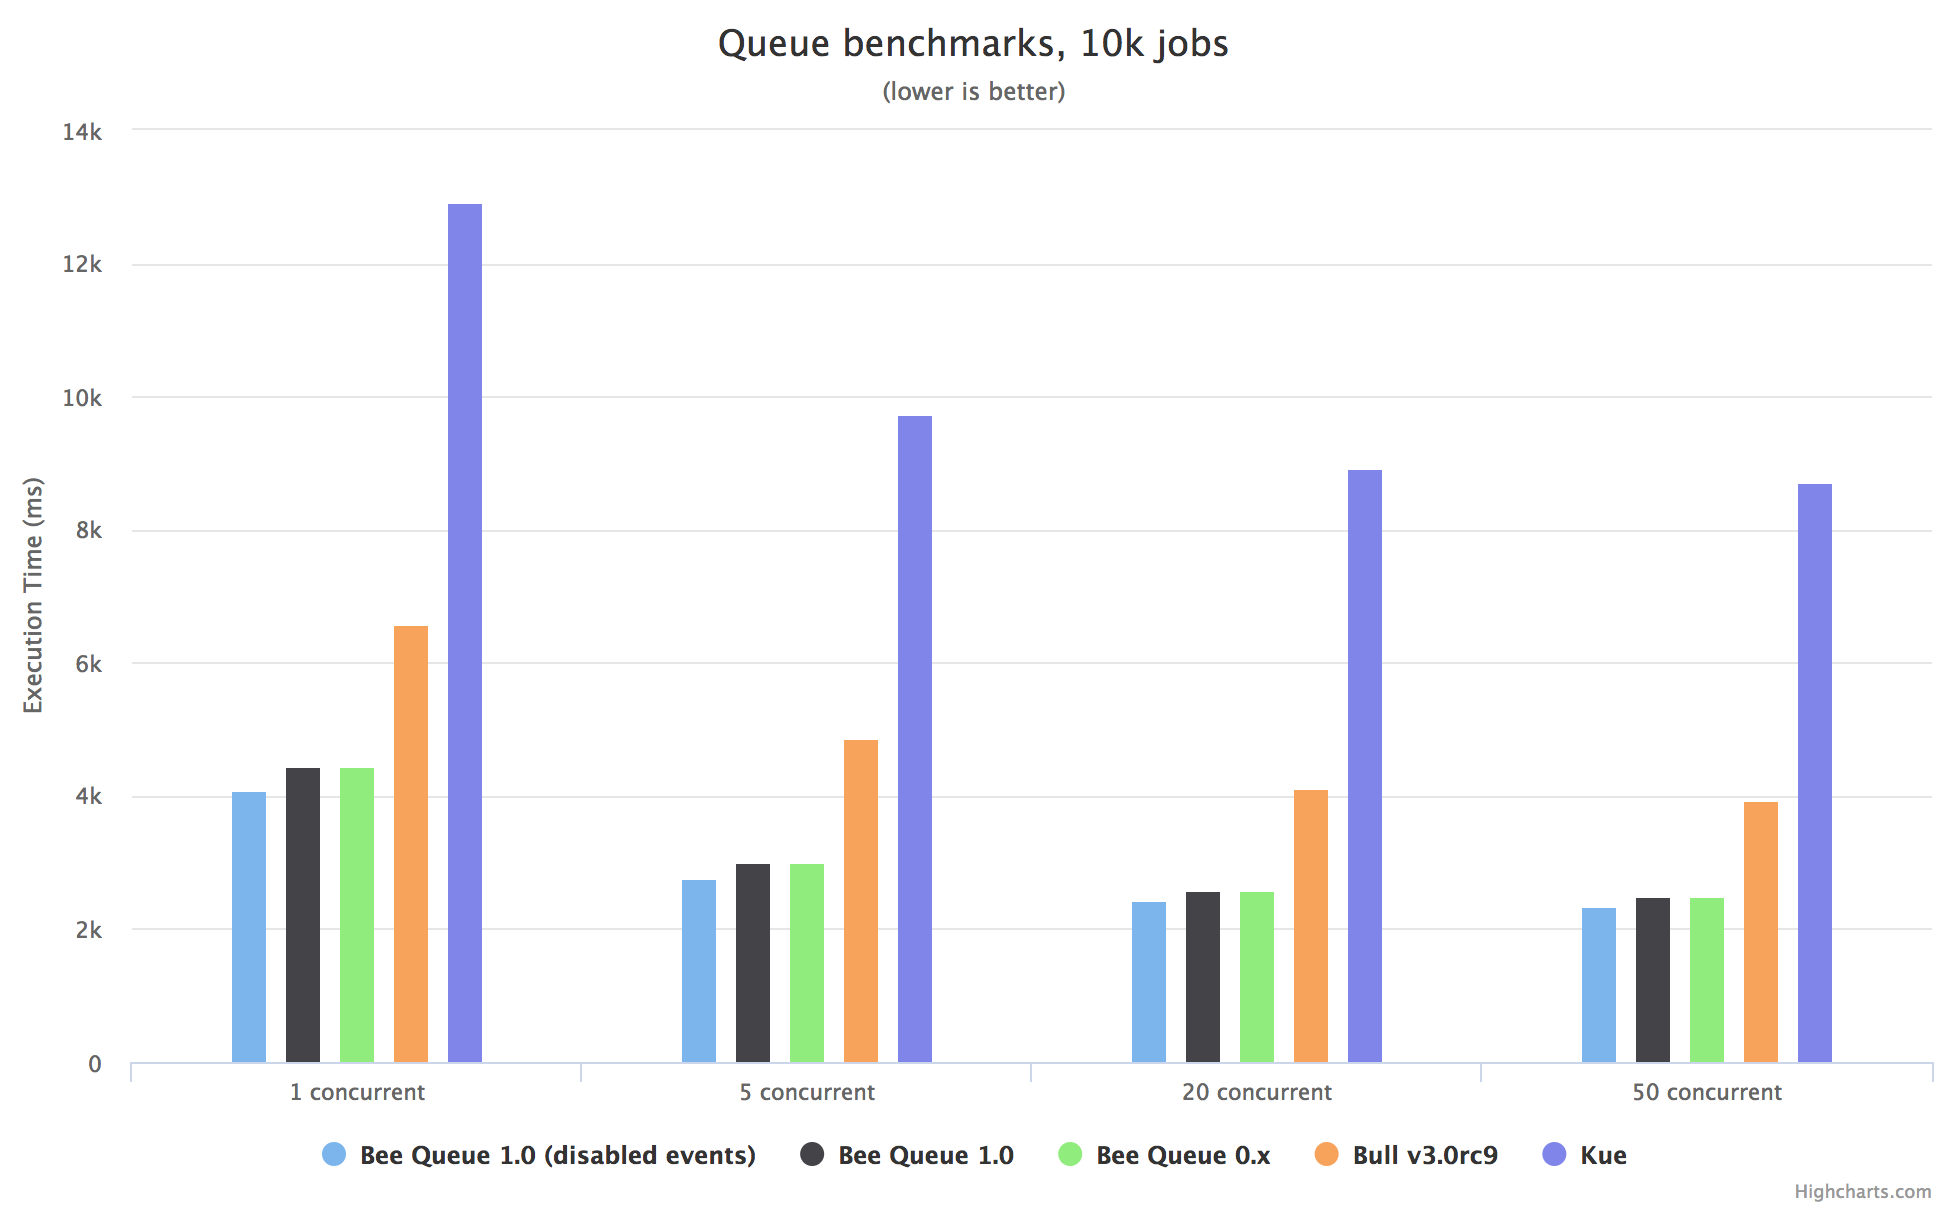
These basic benchmarks ran 10,000 jobs through each library, at varying levels of concurrency, with Node.js (v6.9.1, v6.11.2, v7.6.0, v7.10.1, v8.2.1, v8.3.0) and Redis (v3.2.10, v4.0.1) running directly on an Amazon AWS EC2 m4.large. The numbers shown are averages of 36 runs, 3 for each combination of the aforementioned Redis and Node versions. The raw data collected and code used are available in the benchmark folder.
Web Interface
Check out the Arena web interface to manage jobs and inspect queue health.
Overview
Creating Queues
Queue objects are the starting point to everything this library does. To make one, we just need to give it a name, typically indicating the sort of job it will process:
const Queue = require('bee-queue');
const addQueue = new Queue('addition');
Queues are very lightweight — the only significant overhead is connecting to Redis — so if you need to handle different types of jobs, just instantiate a queue for each:
const subQueue = new Queue('subtraction', {
  redis: {
    host: 'somewhereElse',
  },
  isWorker: false,
});
Here, we pass a settings object to specify an alternate Redis host and to indicate that this queue will only add jobs (not process them). See Queue Settings for more options.
Creating Jobs
Jobs are created using Queue.createJob(data), which returns a Job object storing arbitrary data.
Jobs have a chaining API for configuring the Job, and .save([cb]) method to save the job into Redis and enqueue it for processing:
const job = addQueue.createJob({x: 2, y: 3});
job
  .timeout(3000)
  .retries(2)
  .save()
  .then((job) => {
    // job enqueued, job.id populated
  });
The Job's save method returns a Promise in addition to calling the optional callback.
Each Job can be configured with the commands .setId(id), .retries(n), .backoff(strategy, delayFactor), .delayUntil(date|timestamp), and .timeout(ms) for setting options.
Jobs can later be retrieved from Redis using Queue#getJob, but most use cases won't need this, and can instead use Job and Queue Events.
Advanced: Bulk-Creating Jobs
Normally, creating and saving jobs blocks the underlying redis client for the full duration of an RTT to the Redis server. This can reduce throughput in cases where many operations should occur without delay - particularly when there are many jobs that need to be created quickly. Use Queue#saveAll to save an iterable (e.g. an Array) containing jobs in a pipelined network request, thus pushing all the work out on the wire before hearing back from the Redis server.
addQueue
  .saveAll([addQueue.createJob({x: 3, y: 4}), addQueue.createJob({x: 4, y: 5})])
  .then((errors) => {
    // The errors value is a Map associating Jobs with Errors. This will often be an empty Map.
  });
Each job in the array provided to saveAll will be mutated with the ID it gets assigned.
Processing Jobs
To start processing jobs, call Queue.process and provide a handler function:
addQueue.process(function (job, done) {
  console.log(`Processing job ${job.id}`);
  return done(null, job.data.x + job.data.y);
});
Instead of calling the provided callback, the handler function can return a Promise. This enables the intuitive use of async/await:
addQueue.process(async (job) => {
  console.log(`Processing job ${job.id}`);
  return job.data.x + job.data.y;
});
The handler function is given the job it needs to process, including job.data from when the job was created. It should then pass results either by returning a Promise or by calling the done callback. For more on handlers, see Queue#process.
.process can only be called once per Queue instance, but we can process on as many instances as we like, spanning multiple processes or servers, as long as they all connect to the same Redis instance. From this, we can easily make a worker pool of machines who all run the same code and spend their lives processing our jobs, no matter where those jobs are created.
.process can also take a concurrency parameter. If your jobs spend most of their time just waiting on external resources, you might want each processor instance to handle at most 10 at a time:
const baseUrl = 'http://www.google.com/search?q=';
subQueue.process(10, function (job, done) {
  http.get(`${baseUrl}${job.data.x}-${job.data.y}`, function (res) {
    // parse the difference out of the response...
    return done(null, difference);
  });
});
Progress Reporting
Handlers can send progress reports, which will be received as events on the original job instance:
const job = addQueue.createJob({x: 2, y: 3}).save();
job.on('progress', (progress) => {
  console.log(
    `Job ${job.id} reported progress: page ${progress.page} / ${progress.totalPages}`
  );
});

addQueue.process(async (job) => {
  // do some work
  job.reportProgress({page: 3, totalPages: 11});
  // do more work
  job.reportProgress({page: 9, totalPages: 11});
  // do the rest
});
Just like .process, these progress events work across multiple processes or servers; the job instance will receive the progress event no matter where processing happens. The data passed through can be any JSON-serializable value. Note that this mechanism depends on Pub/Sub, and thus will incur additional overhead for each additional worker node.
Job and Queue Events
There are three classes of events emitted by Bee-Queue objects: Queue Local events, Queue PubSub events, and Job events. The linked API Reference sections provide a more complete overview of each.
Progress reporting, demonstrated above, happens via Job events. Jobs also emit succeeded events, which we've seen in the opening example, and failed and retrying events.
Queue PubSub events correspond directly to Job events: job succeeded, job retrying, job failed, and job progress. These events fire from all queue instances and for all jobs on the queue.
Queue local events include ready and error on all queue instances, and succeeded, retrying, and failed on worker queues corresponding to the PubSub events being sent out.
Note that Job events become unreliable across process restarts, since the queue's reference to the associated job object will be lost. Queue-level events are thus potentially more reliable, but Job events are more convenient in places like HTTP requests where a process restart loses state anyway.
Stalling Jobs
Bee-Queue attempts to provide "at least once delivery". Any job enqueued should be processed at least once - and if a worker crashes, gets disconnected, or otherwise fails to confirm completion of the job, the job will be dispatched to another worker for processing.
To make this happen, workers periodically phone home to Redis about each job they're working on, just to say "I'm still working on this and I haven't stalled, so you don't need to retry it." The checkStalledJobs method finds any active jobs whose workers have gone silent (not phoned home for at least stallInterval ms), assumes they have stalled, emits a stalled event with the job id, and re-enqueues them to be picked up by another worker.
Optimizing Redis Connections
By default, every time you create a queue instance with new Queue() a new redis connection will be created. If you have a small number of queues accross a large number of servers this will probably be fine. If you have a large number of queues with a small number of servers, this will probably be fine too. If your deployment gets a bit larger you will likely need to optimize the Redis connections.
Let's say for example you have a web application with 30 producer queues and you run 10 webservers & 10 worker servers, each one with 4 processes/server. With the default settings this is going to add up to a lot of Redis connections. Each Redis connection consumes a fairly large chunk of memory, and it adds up quickly!
The producer queues are the ones that run on the webserver and they push jobs into the queue. These queues do not need to receive events so they can all share one redis connection by passing in an instance of node_redis RedisClient.
Example:
```js // producer queues running on the web server const Queue = require('bee-queue'); const redis = require('redis'); const sharedConfig = { getEvents: false, isWo
Extension points exported contracts — how you extend this code
QueueSettings (Interface)Core symbols most depended-on inside this repo
createJobShape
Languages
Modules by API surface
Dependencies from manifests, versioned
For agents
$ claude mcp add bee-queue \
  -- python -m otcore.mcp_server <graph>