github.com/async-labs/builderbook @v2.0.0
README
Open source web app (Builder Book)
![]()
![]()
Builder Book is an open source web app to publish documentation or books. The app is built with React/Material-UI/Next/Express/Mongoose/MongoDB and includes these third party APIs: Google, Github, AWS SES, Mailchimp, Stripe.
- Live app: https://builderbook.org/books/builder-book/introduction.
- Learn how to build this app from scratch with our book
We've used this builderbook project to build saas, async, and other real-world web apps.
How can you use this app?
- As learning material for React/Material-UI/Next/Express/Mongoose/MongoDB stack
-
As learning material for Google/Github/AWS SES/Mailchimp/Stripe APIs.
-
As starting point for your own project. Start from our boilerplate or modify the final app.
-
As a production-ready web app to publish documentation or sell content on your own website (we sell our own book).
Contents
- Showcase
- Run locally
- Add a new book
- Add your own styles
- Deploy
- Deploy to Heroku
- Scaling
- Screenshots
- Built with
- Core stack
- Third party APIs
- Docker
- Contributing
- Team
- License
- Project structure
Showcase
Check out projects built with the help of this open source app. Feel free to add your own project by creating a pull request. - Retaino by Earl Lee : Save, annotate, review, and share great web content. Receive smart email digests to retain key information. - SaaS boilerplate app: Open source web app that saves you weeks of work when building your own SaaS product. - Harbor: Open source web app that allows anyone with a Gmail account to automatically charge for advice sent via email. - Async: asynchronous communication and project management tool for small teams of software engineers.
Run locally
- Clone the project and run
yarnto add packages. - Before you start the app, create a
.envfile at the app's root. This file must have values for some env variables specified below. - To get
MONGO_URL_TEST, we recommend a free MongoDB at MongoDB Atlas (to be updated soon with MongoDB Atlas, see issue). -
Get
Google_clientIDandGoogle_clientSecretby following official OAuth tutorial.Important: For Google OAuth app, callback URL is: http://localhost:8000/oauth2callback
Important: You have to enable Google+ API in your Google Cloud Platform account.
-
Specify your own secret key for Express session
SESSION_SECRET: https://github.com/expressjs/session#secret
To use all features and third-party integrations (such as Stripe, Google OAuth, Mailchimp), add values for all of the following env variables in your .env file:
.env :
```
# Used in server/app.js
MONGO_URL="xxxxxx"
MONGO_URL_TEST="xxxxxx"
SESSION_SECRET="xxxxxx"
# Used in server/google.js Google_clientID="xxxxxx" Google_clientSecret="xxxxxx"
# Used in server/aws.js Amazon_accessKeyId="xxxxxx" Amazon_secretAccessKey="xxxxxx" Amazon_region="xxxxxx"
# Used in server/models/User.js EMAIL_SUPPORT_FROM_ADDRESS="xxxxxx"
# All environmental variables above this line are required for successful sign up
# Used in server/github.js Github_Test_ClientID="xxxxxx" Github_Test_SecretKey="xxxxxx" Github_Live_ClientID="xxxxxx" Github_Live_SecretKey="xxxxxx"
# Used in server/stripe.js Stripe_Test_SecretKey="xxxxxx" Stripe_Live_SecretKey="xxxxxx"
# Used in server/mailchimp.js MAILCHIMP_API_KEY="xxxxxx" MAILCHIMP_REGION="xxxxxx" MAILCHIMP_SIGNUPS_LIST_ID="xxxxxx" MAILCHIMP_PURCHASED_LIST_ID="xxxxxx" MAILCHIMP_TUTORIALS_LIST_ID="xxxxxx"
```
- Start the app with
GA_TRACKING_ID=xxxxxx StripePublishableKey=xxxxxx yarn dev. - To get
GA_TRACKING_ID, set up Google Analytics and follow these instructions to find your tracking ID. - To get
StripePublishableKey, set up Stripe and find your key here.
Env keys GA_TRACKING_ID and StripePublishableKey are universally available (client and server). Env keys inside .env file are used in server code only.
- The first registered user in the app becomes an Admin user (user document gets parameters"isAdmin": true).
Add a new book
- Create a new Github repo (public or private).
- In that repo, create an
introduction.mdfile and write some content. - At the top of your
introduction.mdfile, add metadata in the format shown below. See this file as an example.
```
title: Introduction seoTitle: title for search engines seoDescription: description for search engines isFree: true
```
- Go to the app, click "Connect Github".
- Click "Add Book". Enter details and select the Github repo you created.
- Click "Save".
When you add new .md files or update content, go to the BookDetail page of your app and click Sync with Github.
Important: All .md files in your Github repo must have metadata in the format shown above.
Important: All .md files in your Github repo must have name introduction.md or chapter-N.md.
To make the content of a .md file private (meaning a person must purchase the content to see it), remove isFree:true and add excerpt:"". Add some excerpt content - this content is public and serves as a free preview.
Add your own styles
To change the color scheme of this app, modify the primary and secondary theme colors inside lib/context.js. Select any colors from Material UI's official color palette.
Recommended ways to add your own styles to this app: 1. Inline style for a single element 2. Reusable style for multiple elements within single page or component 3. Reusable/importable style for multiple pages or components 4. Global style for all pages in application
Inline style for a single element
USE CASE: apply a style to one element on a single page/component
For example, in our book page, we wrote this single inline style:
...
Reusable style for multiple elements within single page or component
USE CASE: apply the same style to multiple elements on a single page/component.
For example, in our tutorials page, we created styleExcerpt and applied it to a `
` element within the page:
const styleExcerpt = {
  margin: '0px 20px',
  opacity: '0.75',
  fontSize: '13px',
};


  ...
Reusable/importable style for multiple pages or components
USE CASE: apply the same style to elements on multiple pages/components.
For example, we created styleH1 inside components/SharedStyles.js and exported the style at the bottom of the file:
const styleH1 = {
  textAlign: 'center',
  fontWeight: '400',
  lineHeight: '45px',
};

module.exports = {
  styleH1,
};
We then imported styleH1 into our book page, as well as our index page, and applied the style to a <h1> element:
import {
  styleH1,
} from '../components/SharedStyles';

<h1 style={styleH1}>
  ...
</h1>
Global style for all pages in application
USE CASE: apply the same style to elements on all pages of your app.
Create your style in pages/_document.js. For example, we specified a style for all hyperlinks that use the <a> element:
<style>
  {`
    a, a:focus {
      font-weight: 400;
      color: #1565C0;
      text-decoration: none;
      outline: none
    }
  `}
</style>
We also specified styles for all content inside a <body> element:
<body
  style={{
    font: '16px Muli',
    color: '#222',
    margin: '0px auto',
    fontWeight: '400',
    lineHeight: '1.5em',
    backgroundColor: '#F7F9FC',
  }}
>
</body>
Deploy
IMPORTANT: Now v1 is depreciated for new users. See the next section about deploying to Heroku.
- Install now:
npm install -g now. - Point your domain to Zeit world nameservers: three steps.
- Create
now.jsonfile. Make sure to add actual values forGA_TRACKING_ID,StripePublishableKey(production-level) andalias. Read more about how to configure now.
{
  "version": 1
  "env": {
    "NODE_ENV": "production",
    "GA_TRACKING_ID": "xxxxxx",
    "StripePublishableKey": "xxxxxx"
  },
  "dotenv": true
  "alias": "mydomain.com",
  "scale": {
    "sfo1": {
      "min": 1,
      "max": 1
    }
  }
}
- Make sure you updated
ROOT_URLvalue inpackage.jsonandlib/getRootURL.js. - Check that you have all production-level env variables in
.env. - In your terminal, deploy the app by running
now. - Now outputs your deployment's URL, for example:
builderbook-zomcvzgtvc.now.sh. - Point successful deployment to your domain with
now aliasornow ln NOW_URL mydomain.com(NOW_URLis URL of your deployment).
Deploy to Heroku
In this section we will learn how to deploy our app to Heroku cloud. We will deploy our React-Next-Express app to lightweight Heroku container called dyno.
Instructions are for app located at /book/8-end.
Adjust route if you are deploying app from the root of this public repo.
We will discuss the following topics in this section: 1. installing Heroku on Linux-based OS 2. creating app on Heroku dashboard 3. preparing app for deployment 4. configuring env variables 5. deploying app 6. checking logs 7. adding custom domain
Let's go step by step.
- Install Heroku CLI (command-line interface) on your OS. Follow the official guide. In this book we provide instructions for Linux-based systems, in particular, a Ubuntu OS. For Ubuntu OS, run in your terminal:
sudo snap install --classic heroku
To confirm a successful installation, run:
heroku --version
As example, my output that confirms successful installation, looks like:
heroku/7.22.7 linux-x64 node-v11.10.1
-
Sign up for Heroku, go to your Heroku dashboard and click purple New button on the right:
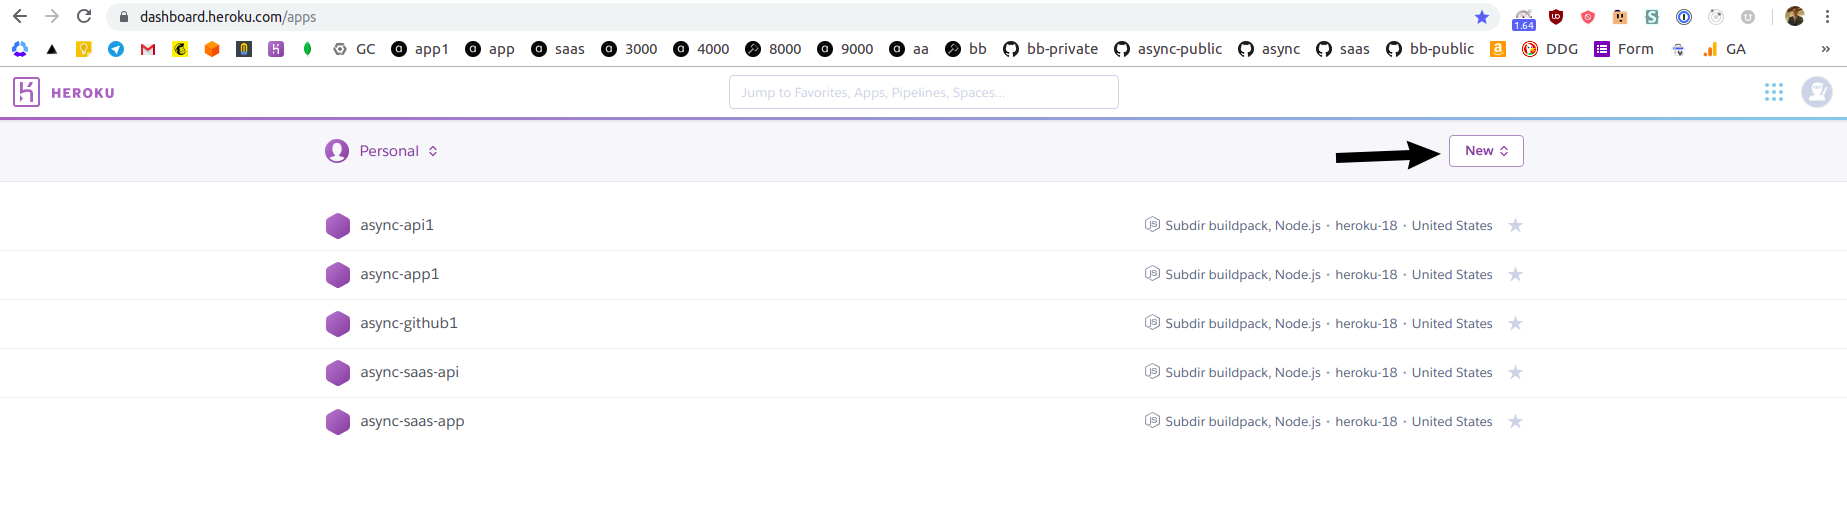
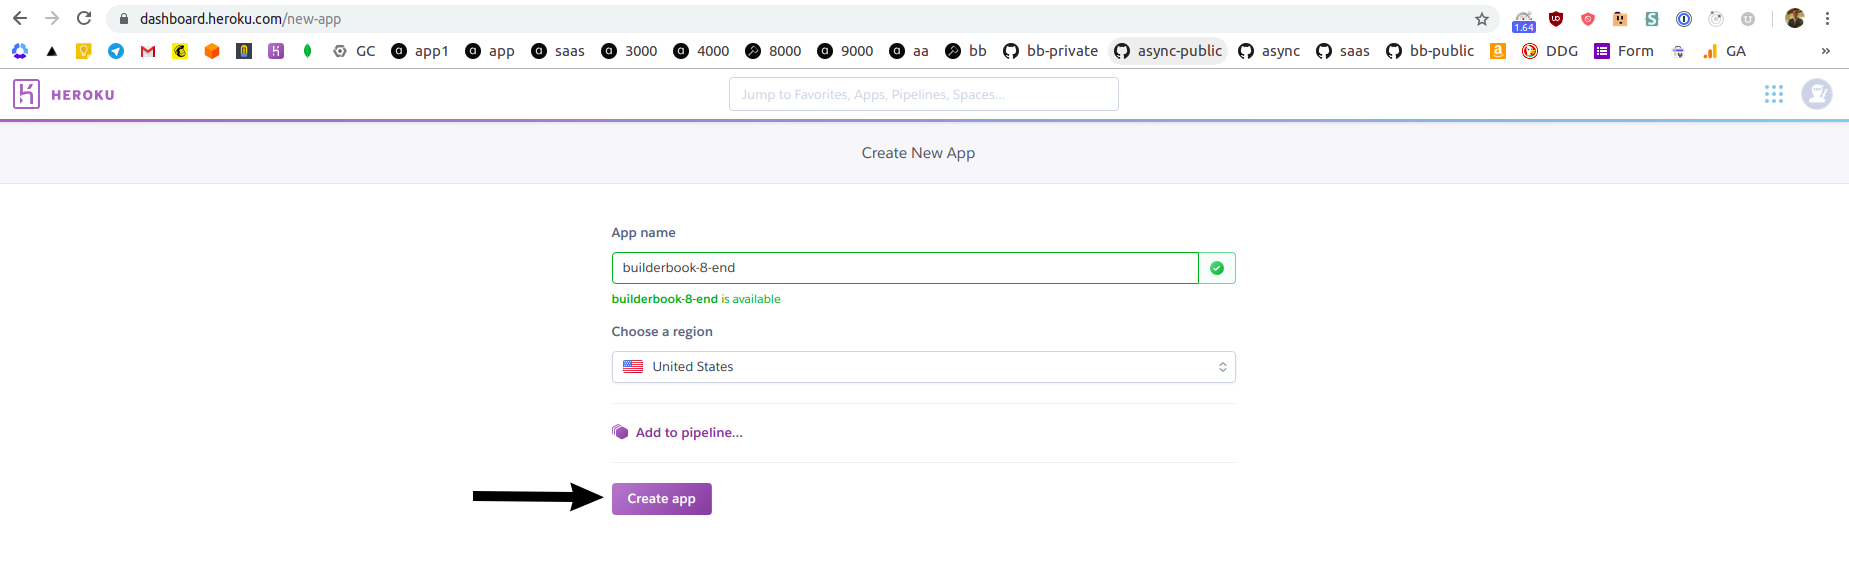
On the next screen, give a name to your app and select a region. Click purple Create app button at the bottom:
You will be redirected to
Deploytab of your newly created Heroku app: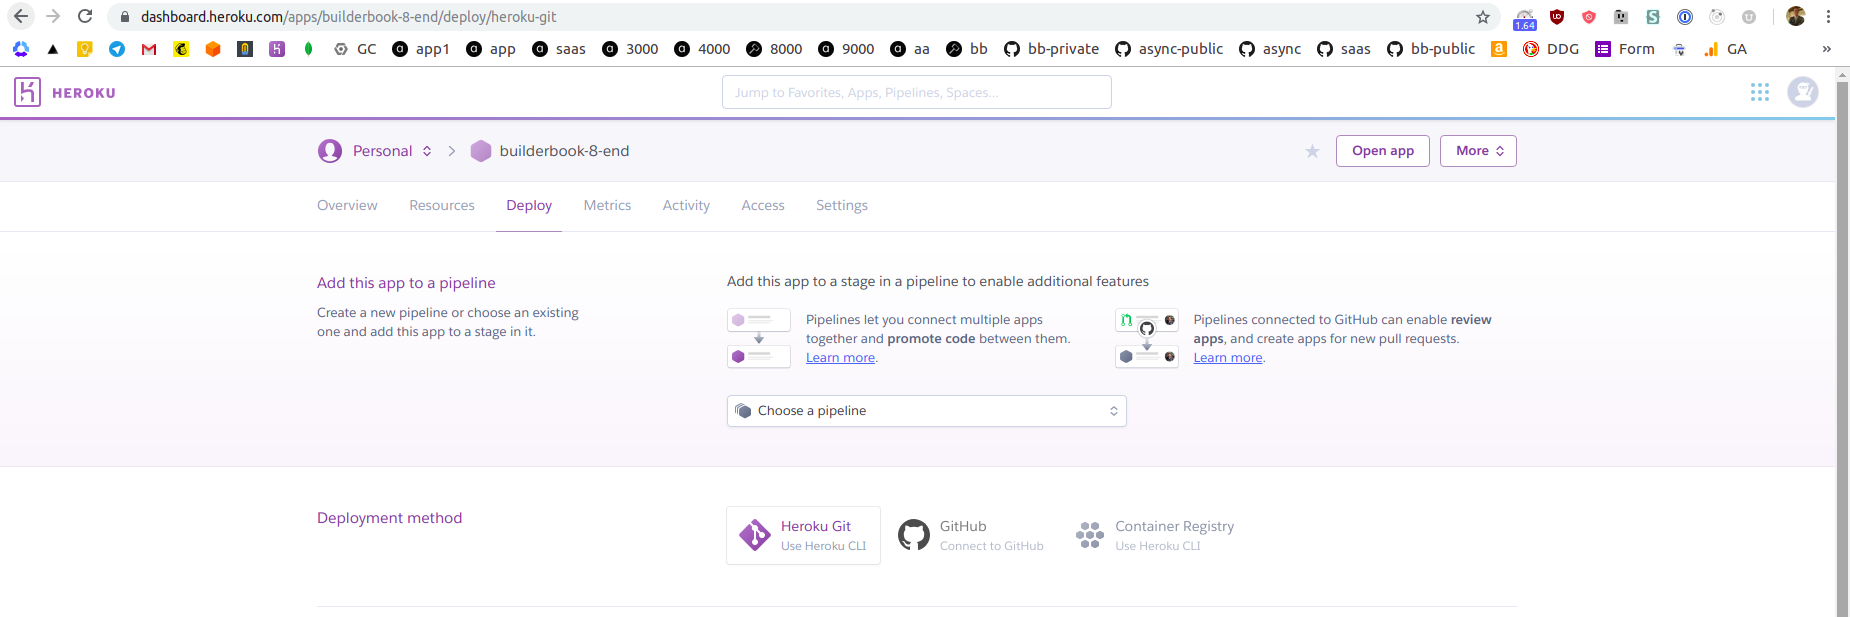
-
As you can see from the above screenshot, you have two options. You can deploy the app directly from your local machine using Heroku CLI or directly from GitHub. In this tutorial, we will deploy a
builderbook/builderbook/book/8-endapp from our public builderbook/builderbook repo hosted on GitHub. Deploying from a private repo will be a similar process.Deploying from GitHub has a few advantages. Heroku uses git to track changes in a codebase. It's possible to deploy app from the local machine using Heroku CLI, however you have to create a Git repo for
builderbook/builderbook/book/8-endwithpackage.jsonfile at the root level. A first advantage is that we can deploy from a non-root folder using GitHub instead of Heroku CLI.A second advantage is automation, later on you can create a branch that automatically deploy every new commit to Heroku. For example, we have a deploy branch for our demo for SaaS boilerplate. When we commit to
masterbranch - ther
Core symbols most depended-on inside this repo
withAuthShape
Languages
Modules by API surface
Dependencies from manifests, versioned
Datastores touched
For agents
$ claude mcp add builderbook \
  -- python -m otcore.mcp_server <graph>