github.com/andpor/react-native-sqlite-storage @6.0.1
Chat with this repoWhat it actually does AI analysis from the code graph — generated when you open this
README
react-native-sqlite-storage
SQLite3 Native Plugin for React Native for both Android (Classic and Native), iOS and Windows
Foundation of this library is based on Chris Brody's Cordova SQLite plugin.
Features: 1. iOS and Android supported via identical JavaScript API. 2. Android in pure Java and Native modes 3. SQL transactions 4. JavaScript interface via plain callbacks or Promises. 5. Pre-populated SQLite database import from application bundle and sandbox 6. Windows supports callback API, identical to iOS and Android
There are sample apps provided in test directory that can be used in with the AwesomeProject generated by React Native. All you have to do is to copy one of those files into your AwesomeProject replacing index.ios.js.
Please let me know your projects that use these SQLite React Native modules. I will list them in the reference section. If there are any features that you think would benefit this library please post them.
The library has been tested with React 16.2 (and earlier) and XCode 7,8,9 - it works fine out of the box without any need for tweaks or code changes. For XCode 7,8 vs. XCode 6 the only difference is that sqlite ios library name suffix is tbd instead of dylib.
Version 3.2 is the first version compatible with RN 0.40.
Installation
npm install --save react-native-sqlite-storage
Then follow the instructions for your platform to link react-native-sqlite-storage into your project
Promises
To enable promises, run
SQLite.enablePromise(true);
iOS
Standard Method
** React Native 0.60 and above **
Run cd ios && pod install && cd ... Linking is not required in React Native 0.60 and above
** React Native 0.59 and below **
Step 1. Install Dependencies
With CocoaPods:
Add this to your Podfile which should be located inside the ios project subdirectory
pod 'React', :path => '../node_modules/react-native'
pod 'react-native-sqlite-storage', :path => '../node_modules/react-native-sqlite-storage'
Or use the sample Podfile included in the package by copying it over to ios subdirectory and replacing AwesomeProject inside of it with the name of your RN project.
Refresh the Pods installation
pod install
OR
pod update
Done, skip to Step 2.
Without CocoaPods:
This command should be executed in the root directory of your RN project
react-native link
rnpm and xcode are dependencies of this project and should get installed with the module but in case there are issue running rnpm link and rnpm/xcode are not already installed you can try to install it globally as follows:
npm -g install rnpm xcode
After linking project should like this:

Step 1a. If rnpm link does not work for you you can try manually linking according to the instructions below:
Drag the SQLite Xcode project as a dependency project into your React Native XCode project
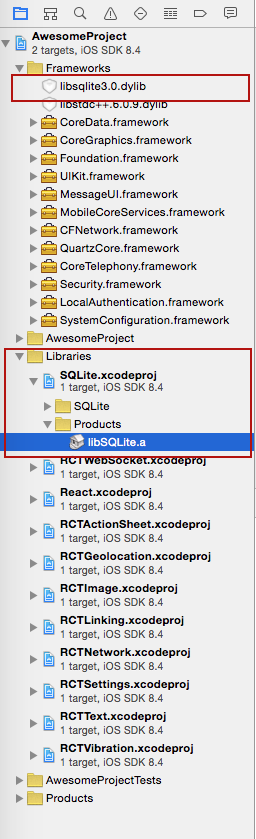
XCode SQLite libraries dependency set up
Add libSQLite.a (from Workspace location) to the required Libraries and Frameworks. Also add sqlite3.0.tbd (XCode 7) or libsqlite3.0.dylib (XCode 6 and earlier) in the same fashion using Required Libraries view (Do not just add them manually as the build paths will not be properly set)
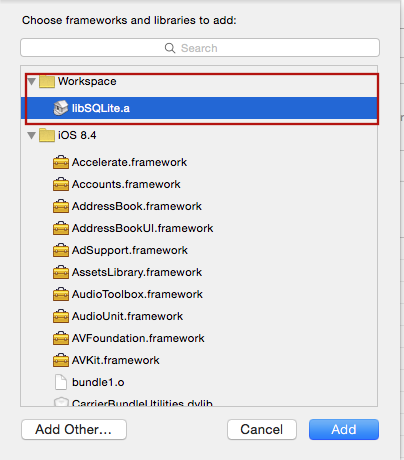
Step 2. Application JavaScript require
Add var SQLite = require('react-native-sqlite-storage') to your index.ios.js

Step 3. Write application JavaScript code using the SQLite plugin
Add JS application code to use SQLite API in your index.ios.js etc. Here is some sample code. For full working example see test/index.ios.callback.js. Please note that Promise based API is now supported as well with full examples in the working React Native app under test/index.ios.promise.js
errorCB(err) {
  console.log("SQL Error: " + err);
},

successCB() {
  console.log("SQL executed fine");
},

openCB() {
  console.log("Database OPENED");
},

var db = SQLite.openDatabase("test.db", "1.0", "Test Database", 200000, openCB, errorCB);
db.transaction((tx) => {
  tx.executeSql('SELECT * FROM Employees a, Departments b WHERE a.department = b.department_id', [], (tx, results) => {
      console.log("Query completed");

      // Get rows with Web SQL Database spec compliance.

      var len = results.rows.length;
      for (let i = 0; i < len; i++) {
        let row = results.rows.item(i);
        console.log(`Employee name: ${row.name}, Dept Name: ${row.deptName}`);
      }

      // Alternatively, you can use the non-standard raw method.

      /*
        let rows = results.rows.raw(); // shallow copy of rows Array

        rows.map(row => console.log(`Employee name: ${row.name}, Dept Name: ${row.deptName}`));
      */
    });
});
How to use (Android):
** React Native 0.60 and above **
If you would like to use the devices SQLite there are no extra steps.
However, if you would like to use the SQLite bundled with this library (includes support for FTS5), add the following to your react-native.config.js
module.exports = {
  ...,
  dependencies: {
    ...,
    "react-native-sqlite-storage": {
      platforms: {
        android: {
          sourceDir:
            "../node_modules/react-native-sqlite-storage/platforms/android-native",
          packageImportPath: "import io.liteglue.SQLitePluginPackage;",
          packageInstance: "new SQLitePluginPackage()"
        }
      }
    }
    ...
  }
  ...
};
** React Native 0.59 and below **
Step 1 - Update Gradle Settings (located under Gradle Settings in Project Panel)
// file: android/settings.gradle
...

include ':react-native-sqlite-storage'
project(':react-native-sqlite-storage').projectDir = new File(rootProject.projectDir, '../node_modules/react-native-sqlite-storage/platforms/android') // react-native-sqlite-storage >= 4.0.0
// IMPORTANT: if you are working with a version less than 4.0.0 the project directory is '../node_modules/react-native-sqlite-storage/src/android'
Step 2 - Update app module Gradle Build script (located under Gradle Settings in Project Panel)
// file: android/app/build.gradle
...

dependencies {
    ...
    implementation project(':react-native-sqlite-storage')
}
Step 3 - Register React Package (this should work on React version but if it does not , try the ReactActivity based approach. Note: for version 3.0.0 and below you would have to pass in the instance of your Activity to the SQLitePluginPackage constructor
...
import org.pgsqlite.SQLitePluginPackage;

public class MainActivity extends Activity implements DefaultHardwareBackBtnHandler {

    private ReactInstanceManager mReactInstanceManager;
    private ReactRootView mReactRootView;

    @Override
    protected void onCreate(Bundle savedInstanceState) {
        super.onCreate(savedInstanceState);
        mReactRootView = new ReactRootView(this);
        mReactInstanceManager = ReactInstanceManager.builder()
                .setApplication(getApplication())
                .setBundleAssetName("index.android.bundle")  // this is dependant on how you name you JS files, example assumes index.android.js
                .setJSMainModuleName("index.android")        // this is dependant on how you name you JS files, example assumes index.android.js
                .addPackage(new MainReactPackage())
                .addPackage(new SQLitePluginPackage())       // register SQLite Plugin here
                .setUseDeveloperSupport(BuildConfig.DEBUG)
                .setInitialLifecycleState(LifecycleState.RESUMED)
                .build();
        mReactRootView.startReactApplication(mReactInstanceManager, "AwesomeProject", null); //change "AwesomeProject" to name of your app
        setContentView(mReactRootView);
    }
...
Alternative approach on newer versions of React Native (0.18+). Note: for version 3.0.0 and below you would have to pass in the instance of your Activity to the SQLitePluginPackage constructor
import org.pgsqlite.SQLitePluginPackage;

public class MainApplication extends Application implements ReactApplication {
  ......

  /**
   * A list of packages used by the app. If the app uses additional views
   * or modules besides the default ones, add more packages here.
   */
    @Override
    protected List<ReactPackage> getPackages() {
      return Arrays.<ReactPackage>asList(
        new SQLitePluginPackage(),   // register SQLite Plugin here
        new MainReactPackage());
    }
}
Step 4 - Require and use in Javascript - see full examples (callbacks and Promise) in test directory.
// file: index.android.js

var React = require('react-native');
var SQLite = require('react-native-sqlite-storage')
...
Windows
** RNW 0.63 with Autolinking and above **
No manual steps required
** React Native 0.62 **
Step 1: Update the solution file
Add the SQLitePlugin project to your solution.
- Open the solution in Visual Studio 2019
- Right-click Solution icon in Solution Explorer > Add > Existing Project
- Select
node_modules\react-native-sqlite-storage\platforms\windows\SQLitePlugin\SQLitePlugin.vcxproj
Step 2: Update the .vcxproj file
Add a reference to SQLitePlugin to your main application project. From Visual Studio 2019:
- Right-click main application project > Add > Reference...
- Check
SQLitePluginfrom Solution Projects
Step 3: Update the pch.h file
Add #include "winrt/SQLitePlugin.h".
Step 4: Register the package in App.cpp
Add PackageProviders().Append(winrt::SQLitePlugin::ReactPackageProvider()); before InitializeComponent();.
Refer to this guide for more details: https://microsoft.github.io/react-native-windows/docs/next/native-modules-using
Setting up your project to import a pre-populated SQLite database from application for iOS
Step 1 - Create 'www' folder.
Create a folder called 'www' (yes must be called precisely that else things won't work) in the project folder via Finder
Step 2 - Create the database file
Copy/paste your pre-populated database file into the 'www' folder. Give it the same name you are going to use in openDatabase call in your application
Step 3 - Add file to project
in XCode, right click on the main folder and select Add Files to 'your project name'
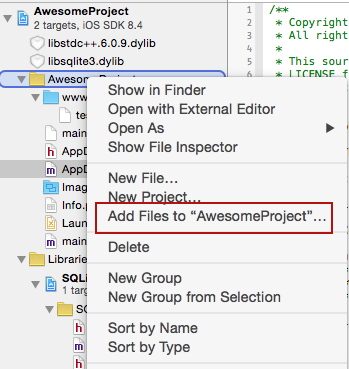
Step 4 - Choose files to add
In the Add Files dialog, navigate to the 'www' directory you created in Step 1, select it, make sure you check the option to Create Folder Reference
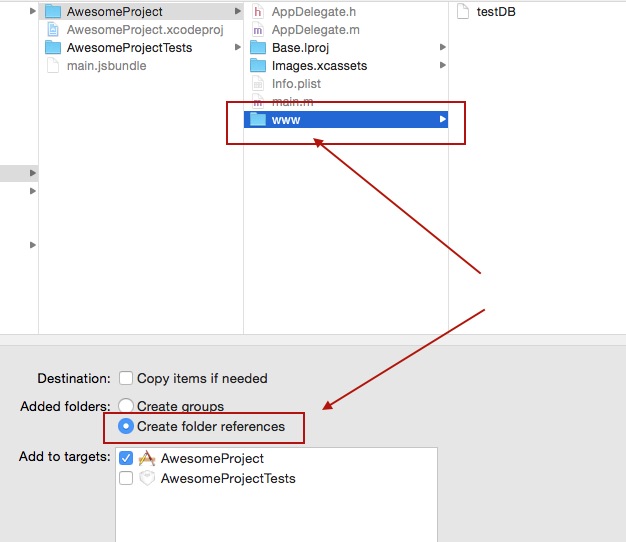
Step 5 - Verify project structure
Ensure your project structure after previous steps are executed looks like this
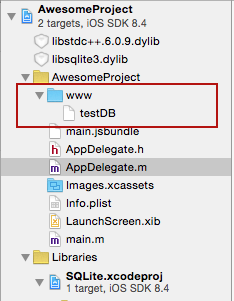
Step 6 - Adjust openDatabase call
Modify you openDatabase call in your application adding createFromLocation param. If you named your database file in step 2 'testDB' the openDatabase call should look like something like this:
  ...
  1.SQLite.openDatabase({name : "testDB", createFromLocation : 1}, okCallback,errorCallback);
  // default - if your folder is called www and data file is named the same as the dbName - testDB in this example
  2.SQLite.openDatabase({name : "testDB", createFromLocation : "~data/mydbfile.sqlite"}, okCallback,errorCallback);
  // if your folder is called data rather than www or your filename does not match the name of the db
  3.SQLite.openDatabase({name : "testDB", createFromLocation : "/data/mydbfile.sqlite"}, okCallback,errorCallback);
  // if your folder is not in app bundle but in app sandbox i.e. downloaded from some remote location.
  ...
For Android, the www directory is always relative to the assets directory for the app: src/main/assets
Enjoy!
Opening a database
Opening a database is slightly different between iOS and Android. Where as on Android the location of the database file is fixed, there are three choices of where the database file can be located on iOS. The 'location' parameter you provide to openDatabase call indicated where you would like the file to be created. This parameter is neglected on Android.
WARNING: the default location on iOS has changed in version 3.0.0 - it is now a no-sync location as mandated by Apple so the release is backward incompatible.
To open a database in default no-sync location (affects iOS only)::
SQLite.openDatabase({name: 'my.db', location: 'default'}, successcb, errorcb);
To specify a different location (affects iOS only):
SQLite.openDatabase({name: 'my.db', location: 'Library'}, successcb, errorcb);
where the location option may be set to one of the following choices:
- default: Library/LocalDatabase subdirectory - NOT visible to iTunes and NOT backed up by iCloud
- Library: Library subdirectory - backed up by iCloud, NOT visible to iTunes
- Documents: Documents subdirectory - visible to iTunes and backed up by iCloud
- Shared: app group's shared container - see next section
The original webSql style openDatabase still works and the location will implicitly default to 'default' option:
SQLite.openDatabase("myDatabase.db", "1.0", "Demo", -1);
Opening a database in an App Group's Shared Container (iOS)
If you have an iOS app extension which needs to share access to the same DB instance as your main app, you must use the shared container of a registered app group.
Assuming you have already set up an app group and turned
Core symbols most depended-on inside this repo
errorShape
Languages
Modules by API surface
Used by 3 indexed graphs manifest dependencies, hub-wide
For agents
$ claude mcp add react-native-sqlite-storage \
  -- python -m otcore.mcp_server <graph>