github.com/XUANXUQAQ/File-Engine @4.6
Chat with this repoBrowse by type
What it actually does AI analysis from the code graph — generated when you open this
README
如何编译构建本项目
该项目仅支持windows 10以上系统。
1. 将本项目源码下载到本地。
git clone https://github.com/XUANXUQAQ/File-Engine.git
本项目需要jdk17及以上jdk,以及visual studio安装才能编译。
2. 编译项目
项目中的gui界面构建使用了intellij idea的gui designer。依赖放在 libs/forms_rt.jar ,需要先使用maven安装到本地仓库。
在项目根目录下运行以下命令安装forms_rt.jar到本地maven仓库。
mvn install:install-file -Dfile=libs/forms_rt.jar -DgroupId=com.intellij -DartifactId=forms_rt -Dversion=1.0 -Dpackaging=jar
通过修改pom.xml中的标签修改版本号。
<?xml version="1.0" encoding="UTF-8"?>
<project xmlns="http://maven.apache.org/POM/4.0.0"
         xmlns:xsi="http://www.w3.org/2001/XMLSchema-instance"
         xsi:schemaLocation="http://maven.apache.org/POM/4.0.0 http://maven.apache.org/xsd/maven-4.0.0.xsd">
    ...
    <groupId>github.fileengine</groupId>
    <artifactId>File-Engine</artifactId>
    <version>3.5</version>
    ...
</project>
进入项目根目录,打开cmd或者powershell,直接使用python运行build.py即可,后一个参数可以指定jdk目录位置。
pip install vswhere jproperties
python .\build.py
或指定使用的jdk位置,在后面增加参数即可。
python .\build.py "/path/to/jdk"
脚本运行完成后在build文件夹将会生成File-Engine.exe
以下内容已过时
通过maven进行编译构建
mvn clean compile package
编译完成后在target目录下会生成 File-Engine-(版本).jar 以及File-Engine.jar。
其中File-Engine-(版本).jar是不包含依赖的jar包,而File-Engine.jar是包含所有依赖的jar包。

3. 构建启动器
(1) 生成jre
首先使用jdeps分析刚才maven生成的无依赖的jar包(File-Engine-(版本).jar)
jdeps --ignore-missing-deps --list-deps .\File-Engine-${version}.jar

分析完成后再使用jlink工具生成精简后的jre运行环境。
jlink --no-header-files --no-man-pages --compress=2 --module-path jmods --add-modules java.base,java.datatransfer,java.desktop,java.sql --output jre
然后在根目录下创建build文件夹,将生成的jre放入build文件夹中。

(2) 创建File-Engine.zip
jlink生成完成之后,将生成的jre运行环境文件夹重命名为jre,和File-Engine.jar(带有依赖的jar包)一起压缩成File-Engine.zip然后放入launcherWrap源码根目录。
使用Visual Studio打开C++/launcherWrap/launcherWrap.sln,进入launcherWrap文件夹源码根目录。创建File-Engine.zip文件。

File-Engine.zip压缩包中需要放入jre运行环境和刚才maven生成的File-Engine.jar

(3) 更新MD5
启动器通过检查File-Engine.jar的MD5值来更新资源,编译时需要计算File-Engine.jar的MD5值,并找到launcherWrap.cpp更新MD5
进入target文件夹
certutil -hashfile File-Engine.jar md5

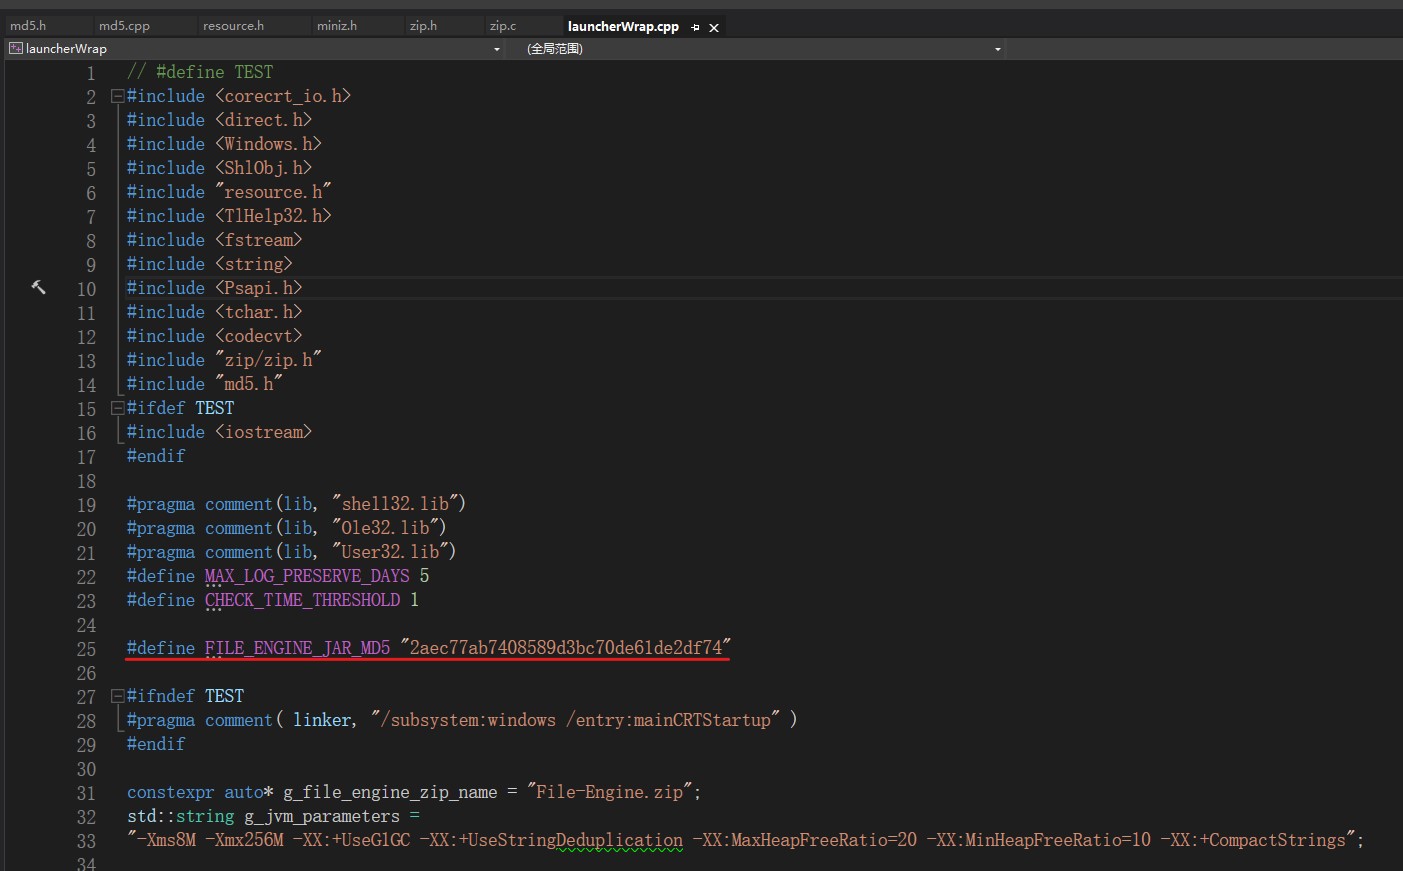
然后编译launcherWrap项目即可。使用release模式编译生成launcherWrap.exe
重命名为File-Engine.exe即可。
Extension points exported contracts — how you extend this code
Core symbols most depended-on inside this repo
Shape
Languages
Modules by API surface
For agents
$ claude mcp add File-Engine \
  -- python -m otcore.mcp_server <graph>