github.com/UiPath/uipathcli @v2.0.54
Chat with this repoWhat it actually does AI analysis from the code graph — generated when you open this
README




uipathcli
The uipathcli project is a command line interface to simplify, script and automate API calls for UiPath services. The CLI works on Windows, Linux and macOS.
Note: This is the UiPath Platform CLI (uipath) for scripting and automating UiPath Cloud API calls (Orchestrator, Document Understanding, AI Center, etc.).
If you are looking for the CLI to build, run, or debug coding agent automations (C# coded workflows, coded test cases, or AI-powered coding agents in UiPath Studio), see the UiPath Coding Agents CLI instead.

Try it out, enjoy, and share your feedback, thoughts, or questions here.
Install
In order to get started quickly, you can run the install scripts for Windows, Linux and macOS.
Install instructions
Windows
Invoke-WebRequest "https://github.com/UiPath/uipathcli/releases/latest/download/uipathcli-windows-amd64.zip" -OutFile "uipathcli.zip" ; Expand-Archive -Force -Path "uipathcli.zip" -DestinationPath "."
Linux
curl -sL "https://github.com/UiPath/uipathcli/releases/latest/download/uipathcli-linux-amd64.tar.gz" | tar -xzv
macOS
curl -sL "https://github.com/UiPath/uipathcli/releases/latest/download/uipathcli-darwin-arm64.tar.gz" | tar -xzv
Install instructions for arm64
Windows (ARM)
Invoke-WebRequest "https://github.com/UiPath/uipathcli/releases/latest/download/uipathcli-windows-arm64.zip" -OutFile "uipathcli.zip" ; Expand-Archive -Force -Path "uipathcli.zip" -DestinationPath "."
Linux (ARM)
curl -sL "https://github.com/UiPath/uipathcli/releases/latest/download/uipathcli-linux-arm64.tar.gz" | tar -xzv
Enable command completion
For autocompletion to work, the uipath executable needs to be in your PATH. Make sure the following commands output the path to the uipath executable:
PowerShell
(Get-Command uipath).Path
Bash
which uipath
You can enable autocompletion by running the following commands depending on which shell you are using:
PowerShell
uipath autocomplete enable --shell "powershell"
Bash
uipath autocomplete enable --shell "bash"
After installing the uipath executable, you can run the interactive config command to finish setting up your CLI:
uipath config
More details about how to configure the CLI can be found in the following sections.
Configuration
The CLI supports multiple ways to authorize with the UiPath services:
-
Client Credentials: Generate secret and configure the CLI to use these long-term credentials. Client credentials should be used in case you want to use the CLI from a script in an automated way.
-
OAuth Login: Login to UiPath using your browser and SSO of choice. This is the preferred flow when you are using the CLI interactively. No need to manage any credentials.
-
Personal Access Token: Generate a PAT and configure the CLI to use the access token.
Client Credentials
In order to use client credentials, you need to set up an External Application (Confidential) and generate an application secret:

-
Go to https://cloud.uipath.com/\<your-org>/portal_/externalApps
-
Click + Add Application
-
Fill out the fields:
- Application Name: \<your-app>
- Application Type:
Confidential application -
+ Add Scopes: Add the permissions you want to assign to your credentials, e.g.
OR.Users.Read -
Click Add and the app id (
clientId) and app secret (clientSecret) should be displayed. -
Run the interactive CLI configuration:
uipath config --auth credentials
The CLI will ask you to enter the main config settings like
- organization and tenant used by UiPath services which are account-scoped or tenant-scoped
- clientId and clientSecret to retrieve the JWT bearer token for authentication
Enter organization [not set]: uipatcleitzc
Enter tenant [not set]: DefaultTenant
Enter client id [*******9026]: <your-client-id>
Enter client secret [*******pcnN]: <your-client-secret>
Successfully configured uipath CLI
After that the CLI should be ready and you can validate that it is working by invoking one of the services (requires OR.Users.Read scope):
uipath orchestrator users get
Response:
{
  "@odata.context": "https://cloud.uipath.com/uipatcleitzc/DefaultTenant/orchestrator_/odata/$metadata#Users",
  "@odata.count": 1,
  "value": [
    {
      "CreationTime": "2021-10-19T10:49:18.907Z",
      "Name": "Administrators",
      "Type": "DirectoryGroup",
      "UserName": "administrators"
    }
  ]
}
OAuth Login
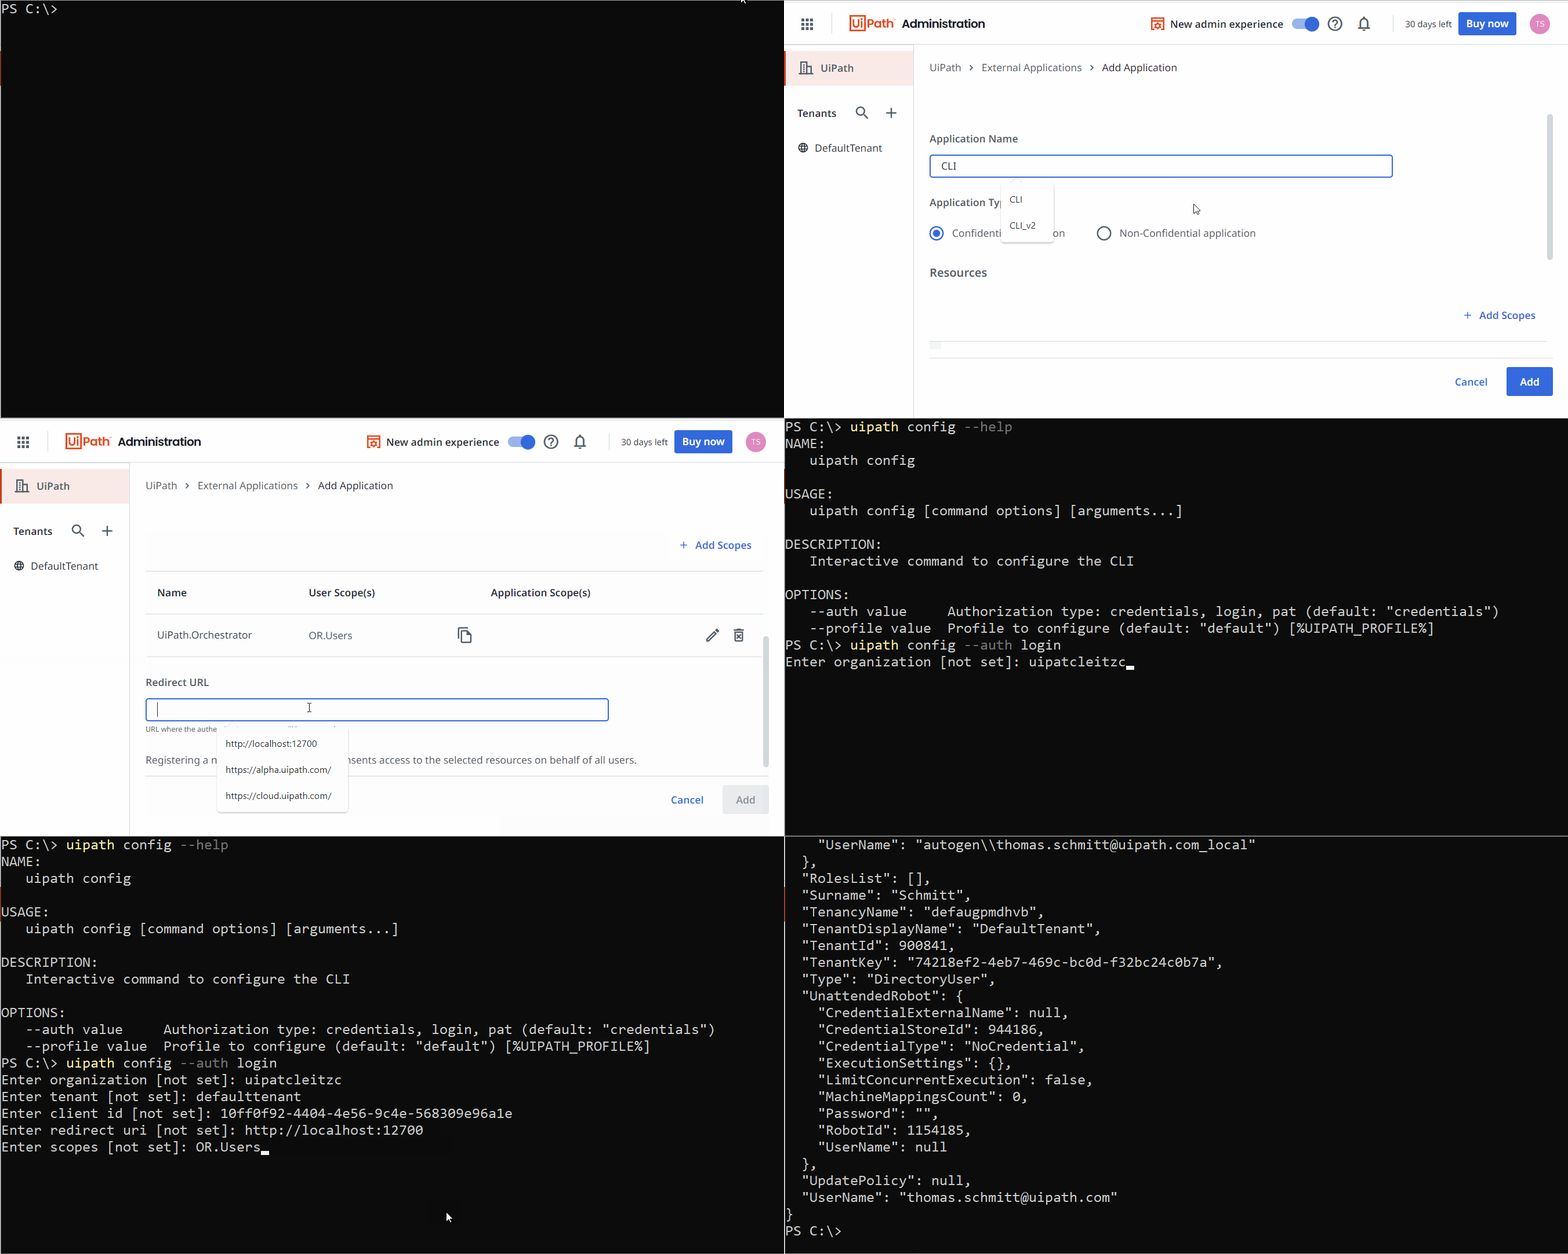
In order to use OAuth login, you need to set up an External Application (Non-Confidential) with a redirect url which points to your local CLI:
-
Go to https://cloud.uipath.com/\<your-org>/portal_/externalApps
-
Click + Add Application
-
Fill out the fields:
- Application Name: \<your-app>
- Application Type:
Non-Confidential application - + Add Scopes: Add the permissions you want to grant the CLI
-
Redirect URL:
http://localhost:12700 -
Click Add and note the app id (
clientId). -
Run the interactive CLI configuration:
uipath config --auth login
The CLI will ask you to enter the main config settings like
- organization and tenant used by UiPath services which are account-scoped or tenant-scoped
- clientId, redirectUri and scopes which are needed to initiate the OAuth flow
Enter organization [not set]: uipatcleitzc
Enter tenant [not set]: DefaultTenant
Enter client id [*******9026]: <your-external-application-id>
Enter redirect uri [not set]: http://localhost:12700
Enter scopes [not set]: OR.Users
Successfully configured uipath CLI
- After that the CLI should be ready and you can validate that it is working by invoking one of the services:
uipath orchestrator users get
Personal Access Token
You need to generate a personal access token (PAT) and configure the CLI to use it:
-
Go to https://cloud.uipath.com/\<your-org>/portal_/personalAccessToken
-
Click + Generate new token
-
Fill out the fields:
- Name: \<token-name>
- Expiration Date: Set an expiry date for the token
-
+ Add Scopes: Add the permissions you want to grant the PAT
-
Click Save and make sure you copy the generated token.
-
Run the interactive CLI configuration:
uipath config --auth pat
The CLI will ask you to enter the main config settings like
- organization and tenant used by UiPath services which are account-scoped or tenant-scoped
- pat your personal access token
Enter organization [not set]: uipatcleitzc
Enter tenant [not set]: DefaultTenant
Enter personal access token [*******26-1]: rt_B637A751...
Successfully configured uipath CLI
After that the CLI should be ready and you can validate that it is working by invoking one of the services.
Configuration File
You can also manually create or edit the configuration file .uipath/config in your home directory. The following config file sets up the default profile with clientId, clientSecret so that the CLI can generate a bearer token before calling any of the services. It also sets the organization and tenant for services which require it.
cat <<EOT > $HOME/.uipath/config
---
profiles:
  - name: default
    organization: <organization-name>
    tenant: <tenant-name>
    auth:
      clientId: <your-client-id>
      clientSecret: <your-client-secret>
EOT
Once you have created the configuration file with the proper secrets, org and tenant information, you should be able to successfully call the services, e.g.
uipath orchestrator users get
Set Config File Values
The CLI provides the command uipath config set to update values in the configuration file.
Example: Set the organization in the default profile
uipath config set --key "organization" --value "myorg"
Example: Create profile which uses the staging environment
uipath config set --key "uri" --value "https://staging.uipath.com" --profile staging
Quickstart Guide
This section explains how to use the uipathcli and highlights some of the most common use-cases.
Package, Deploy and Run Studio Projects
The CLI makes it very easy to package and upload studio projects. You can create a release and execute it using UiPath Orchestrator.
# Download example project
projectUrl="https://raw.githubusercontent.com/UiPath/uipathcli/refs/heads/main/examples/projects/calculator"
curl --remote-name "$projectUrl/project.json" \
     --remote-name "$projectUrl/Main.xaml"

# Build and package project
uipath studio package pack

# Publish the package
uipath studio package publish

# Start process
folderId=$(uipath orchestrator folders get --query "value[0].Id")
jobId=$(uipath orchestrator jobs start-jobs --folder-id "$folderId" \
                                            --start-info "ReleaseName=Calculator" \
                                            --query "value[0].Id")
uipath orchestrator jobs get-by-id --folder-id "$folderId" --key "$jobId"
Analyze Studio Projects
The following command is analyzing a UiPath Studio package using the default governance file and searching for any warnings or errors within the package. It will output violations as human-readable text, specifically showing the error code and the description.
# Download example project
projectUrl="https://raw.githubusercontent.com/UiPath/uipathcli/refs/heads/main/examples/projects/calculator"
curl --remote-name "$projectUrl/project.json" \
     --remote-name "$projectUrl/Main.xaml" \
     --remote-name "$projectUrl/uipath.policy.default.json"

# Analyze project using the uipath.policy.default.json governance file and output all Warnings and Errors
uipath studio package analyze --query "violations[?severity == 'Warning' || severity == 'Error'].[errorCode, description]" \
                              --output text
ST-USG-010      Dependency package UiPath.Testing.Activities is not used.
ST-MRD-002      Activity Log Message has a default name.
TA-DBP-002      Workflow Main.xaml does not have any assigned Test Cases.
ST-USG-034      Your organization requires your project to have an Automation Hub URL defined.
Run Tests
Run your tests in UiPath Orchestrator by executing the following command from your UiPath Studio Project directory:
# Download example project
projectUrl="https://raw.githubusercontent.com/UiPath/uipathcli/refs/heads/main/examples/projects/calculator"
curl --remote-name "$projectUrl/Main.xaml" \
     --remote-name "$projectUrl/project.json" \
     --remote-name "$projectUrl/AddTwoNumbersTest.xaml" \
     --remote-name "$projectUrl/Main.TestData.json"

# Run test cases on the connected UiPath Orchestrator instance
uipath studio test run
The test run command has multi-project support allowing for builds and tests to be executed in parallel. Additionally, it also provides the option of generating JUnit test reports. In order to improve test failure troubleshooting, robot logs can be automatically retrieved for every test case executed.
The following command runs the tests for two projects in parallel, attaches the robot logs and outputs the test results in the JUnit XML format:
uipath studio test run --source "./projects/MyProject1,./projects/MyProject2" --attach-robot-logs "true" --results-output "junit"
Manage Orchestrator Resources
There are various UiPath Orchestrator resources which you can manage through the CLI. This example shows how to create new assets and query for the existing ones:
folderId=$(uipath orchestrator folders get --query "value[0].Id")

# Create new Text asset
uipath orchestrator assets post --folder-id "$folderId" \
                                --name "MyAsset" \
                                --value-scope "Global" \
                                --value-type "Text" \
                                --string-value "my-value"

# List existing assets
uipath orchestrator assets get --folder-id $folderId
Classify Documents using Document Understanding
Extension points exported contracts — how you extend this code
CommandPlugin (Interface)Core symbols most depended-on inside this repo
BuildShape
Languages
Modules by API surface
For agents
$ claude mcp add uipathcli \
  -- python -m otcore.mcp_server <graph>