github.com/SimonAKing/Gwitter @main
Chat with this repoBrowse by type
What it actually does AI analysis from the code graph — generated when you open this
README
Gwitter
🎮 在线体验
- 🌐 在线演示: https://simonaking.com/Gwitter - 体验 Gwitter 的完整功能
- 💭 分享想法: 创建 Issue 参与讨论交流
- 📚 浏览讨论: 在演示站点上探索现有的思考和见解
✨ 项目介绍
✨ "Gwitter" 背后的故事
你有没有想过,当世界上最强大的“笔记”应用遇到全球最受欢迎的微博平台,会碰撞出什么火花?🤔
GitHub Issues 📝 = 被低估的笔记神器(认真的,它超棒!)
Twitter 🐦 = 世界上最大的微博平台
Gwitter 🚀 = 将 GitHub Issues 转化为个人微博平台!
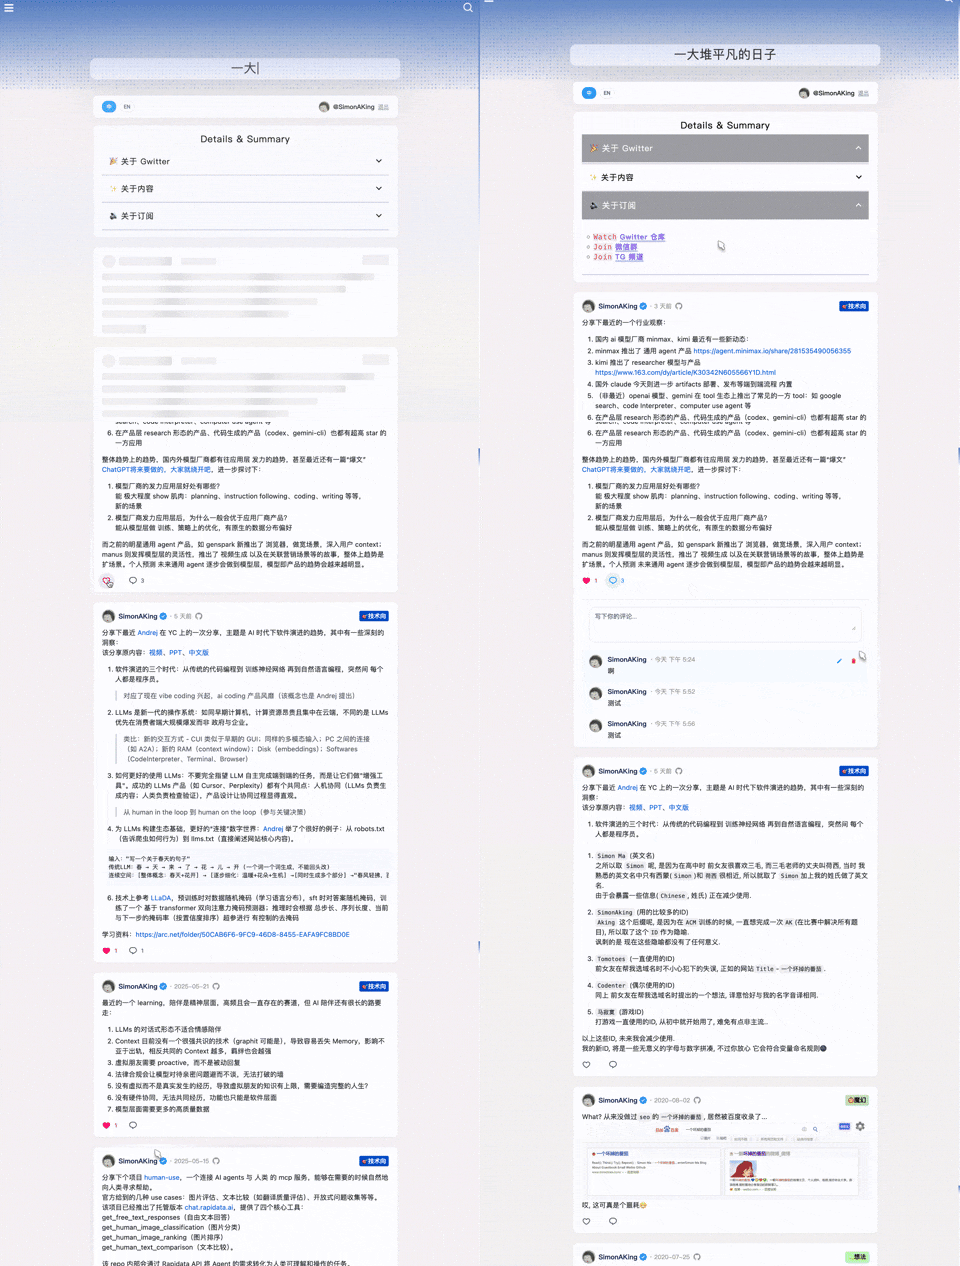
📱 作者的 Gwitter: https://simonaking.com/blog/weibo/ - 看看 Gwitter 在实际中的应用
Gwitter 是一个基于 GitHub Issues 构建的轻量级微博应用。这里记录着我对技术的思考、对生活的感悟,以及一些有趣的发现,欢迎一起交流探讨。
🚀 亮点功能
- 📝 基于 GitHub Issues
- 利用 GitHub Issues 作为内容存储,支持 GitHub 的标签系统进行内容分类
- 👍 社交互动
- 点赞功能:支持 GitHub Reactions(👍 ❤️ 😄 😮 😢 😡 🚀 👀)
- 评论系统:完整的评论功能,支持嵌套回复
- ✨ 视觉体验
- 精美动效:使用 Framer Motion 实现流畅的页面动画
- 响应式设计:完美适配桌面端、平板和移动设备
- 骨架屏:优雅的加载状态展示
- 🌐 用户体验
- 国际化支持:内置中英文双语支持
- 无限滚动:智能分页加载,流畅浏览体验
- 🤖 自动化同步
- 多平台同步:通过 GitHub Actions 自动将新发布的 Issue 同步到其他平台
📝 使用说明
发布内容
- 在配置的 GitHub 仓库中创建新的 Issue
- 使用 Markdown 格式编写内容
- 添加合适的标签进行分类
- 发布后内容会自动同步到 Gwitter 应用

内容管理
- 编辑:直接在 GitHub Issues 中编辑
- 删除:关闭对应的 Issue
- 分类:使用 GitHub Labels 进行内容分类
- 置顶:通过 Issue 的创建顺序控制显示顺序
🤖 自动化同步配置
Gwitter 支持通过 GitHub Actions 自动将新发布的 Issue 同步到 Telegram 和 GitHub Gist。
- 创建同步脚本
- 参考 sync.js 实现
-
在仓库中创建
.github/workflows/sync.yml -
配置环境变量 在 GitHub 仓库的 Settings > Secrets and variables
-
Telegram 配置
- 创建 Telegram Bot(通过 @BotFather)
- 获取 Bot Token 和目标频道/群组的 Chat ID
- 将 Bot 添加到目标频道并授予管理员权限
🛠️ 技术栈
- 前端框架:React 18 + TypeScript
- 构建工具:Rsbuild(基于 Rspack 的快速构建工具)
- 样式方案:Emotion (CSS-in-JS)
- 动画库:Framer Motion + React Flip Move
- 状态管理:React Hooks
- 网络请求:Axios + GitHub GraphQL API
- 国际化:i18next
- 代码规范:ESLint + Prettier
Gwitter/
├── src/                  # 主要源代码
│   ├── components/       # React 组件
│   │   ├── common/      # 共享 UI 组件
│   │   ├── About.tsx    # 关于页面组件
│   │   ├── CommentInput.tsx # 评论输入组件
│   │   └── ...
│   ├── hooks/           # 自定义 React hooks
│   │   └── useAuth.tsx  # 身份验证 hook
│   ├── utils/           # 工具函数
│   │   ├── cache.ts     # 缓存工具
│   │   ├── request.ts   # API 请求工具
│   │   └── index.ts     # 通用工具
│   ├── config/          # 配置文件
│   │   └── index.ts     # 主要配置
│   ├── i18n/            # 国际化
│   │   ├── index.ts     # i18n 设置
│   │   └── locales/     # 语言文件
│   ├── types/           # TypeScript 类型定义
│   │   └── global.d.ts  # 全局类型
│   └── lib/             # 外部库
│       └── collapse.js  # UI 折叠功能
├── demo/                # 演示示例
│   ├── npm-demo/        # NPM/React 演示
│   │   ├── src/         # React 源文件
│   │   │   ├── App.tsx  # 主演示组件
│   │   │   ├── config/  # 演示配置
│   │   │   └── ...
│   │   ├── package.json # 依赖项
│   │   └── vite.config.ts # 构建配置
│   ├── umd-demo/        # UMD/浏览器演示
│   │   └── index.html   # 完整 HTML 演示
│   └── README.md        # 演示文档
├── docs/                # 文档资源
│   └── *.png           # 设置截图
└── dist/               # 构建输出文件
    ├── gwitter.min.js  # UMD 打包文件
    └── gwitter.min.css # 样式文件
📦 安装与使用
🎯 快速开始:查看我们的在线演示,看看 Gwitter 的实际效果!
📖 演示示例
两个演示示例帮助您快速上手:
🔧 NPM 演示 - React 开发
适用于使用构建工具的 React 应用。
cd demo/npm-demo
npm install
npm run dev
🌐 UMD 演示 - 浏览器集成
适用于不使用构建工具的现有网站。
<script src="https://unpkg.com/gwitter/dist/gwitter.min.js"></script>
<link rel="stylesheet" href="https://unpkg.com/gwitter/dist/gwitter.min.css">
📋 设置要求
两个演示都需要 GitHub 配置:
1. 创建 GitHub 仓库用于存储内容
2. 生成具有 repo 和 read:user 权限的个人访问令牌
3. 创建 GitHub OAuth 应用
4. 在演示配置文件中更新您的详细信息
详细设置说明请参见配置设置部分。
方式 1:NPM 安装(推荐)
适用于使用模块打包器的现代 JavaScript 项目:
环境要求
- React: ^18.0.0 或更高版本
- React DOM: ^18.0.0 或更高版本
安装
npm install gwitter react react-dom
# 或
yarn add gwitter react react-dom
使用
import gwitter from 'gwitter';
import 'gwitter/dist/gwitter.min.css';

gwitter({
  container: document.getElementById('comments'),
  config: {
    request: {
      // GitHub Personal Access Token
      token: ['your_token_part1', 'your_token_part2'],

      // OAuth 配置
      clientID: 'your_github_oauth_client_id',
      clientSecret: 'your_github_oauth_client_secret',

      // GitHub 仓库配置
      owner: 'your_github_username',
      repo: 'your_repo_name',

      // 分页配置
      pageSize: 6,

      // CORS 代理(可选)
      autoProxy: 'https://cors-anywhere.azm.workers.dev/https://github.com/login/oauth/access_token',
    },
    app: {
      // 应用功能开关
      onlyShowOwner: false,
      enableRepoSwitcher: false,
      enableAbout: false,
      enableEgg: false,
    },
  }
});
方式 2:UMD(浏览器)
适用于不使用构建工具的直接浏览器使用:
<script crossorigin src="https://unpkg.com/react@18/umd/react.production.min.js"></script>
<script crossorigin src="https://unpkg.com/react-dom@18/umd/react-dom.production.min.js"></script>


<script src="https://unpkg.com/gwitter/dist/gwitter.min.js"></script>
<link rel="stylesheet" href="https://unpkg.com/gwitter/dist/gwitter.min.css">

<script>
  gwitter({
    container: document.getElementById('comments'),
    config: {
      request: {
        // GitHub Personal Access Token
        token: ['your_token_part1', 'your_token_part2'],

        // OAuth 配置
        clientID: 'your_github_oauth_client_id',
        clientSecret: 'your_github_oauth_client_secret',

        // GitHub 仓库配置
        owner: 'your_github_username',
        repo: 'your_repo_name',

        // 分页配置
        pageSize: 6,

        // CORS 代理(可选)
        autoProxy: 'https://cors-anywhere.azm.workers.dev/https://github.com/login/oauth/access_token',
      },
      app: {
        // 应用功能开关
        onlyShowOwner: false,
        enableRepoSwitcher: false,
        enableAbout: false,
        enableEgg: false,
      },
    }
  });
</script>
3. 配置设置
在使用 Gwitter 之前,您需要进行 GitHub 配置:
3.1 创建 GitHub Repository
- 在 GitHub 上创建一个新的仓库用于存储你的 Gwitter 内容
- 记录仓库的
owner(用户名)和repo(仓库名)类似于 https://github.com/SimonAKing/weibo/issues

3.2 申请 GitHub Personal Access Token
- 访问 GitHub Settings > Developer settings > Personal access tokens
-
点击 "Generate new token (classic)"

-
选择以下权限:
repo(完整仓库访问权限)read:user(读取用户信息)- 生成并保存 token

3.3 创建 GitHub OAuth 应用
- 访问 GitHub Settings > Developer settings > OAuth Apps
-
点击 "New OAuth App"

-
填写应用信息:
- Application name: Gwitter
- Homepage URL: 你的部署域名
- Authorization callback URL: 你的部署域名
- 创建后获得
Client ID和Client Secret
4. API 参考
gwitter(options)
初始化并渲染 Gwitter 的主函数。
参数:
options(Object): Gwitter 的配置选项
options.container (HTMLElement | string) - 必需
- 渲染 Gwitter 的 DOM 元素或 CSS 选择器
- 示例:document.getElementById('comments') 或 '#comments'
options.config (Object) - 必需 - 包含请求和应用设置的配置对象
options.config.request (Object) - 必需 - GitHub API 和身份验证配置
| 属性 | 类型 | 必需 | 说明 | 示例 |
|---|---|---|---|---|
token |
string[] |
✅ | GitHub Personal Access Token 分割为两部分以提高安全性 | ['ghp_xxxx', 'xxxx'] |
clientID |
string |
✅ | GitHub OAuth 应用的 Client ID | 'your_client_id' |
clientSecret |
string |
✅ | GitHub OAuth 应用的 Client Secret | 'your_client_secret' |
owner |
string |
✅ | GitHub 仓库所有者(用户名) | 'your_username' |
repo |
string |
✅ | GitHub 仓库名称 | 'your_repo_name' |
pageSize |
number |
❌ | 每页加载的 issue 数量(默认:6) | 6 |
autoProxy |
string |
❌ | OAuth 请求的 CORS 代理 URL | 'https://cors-anywhere.azm.workers.dev/https://github.com/login/oauth/access_token' |
options.config.app (Object) - 可选 - 应用行为配置
| 属性 | 类型 | 默认值 | 说明 | 示例 |
|---|---|---|---|---|
onlyShowOwner |
boolean |
false |
只显示仓库所有者的 issues | false |
enableRepoSwitcher |
boolean |
false |
启用仓库切换功能 | false |
enableAbout |
boolean |
false |
显示关于页面/部分 | false |
enableEgg |
boolean |
false |
启用彩蛋功能 | false |
返回值:
- Promise<void> - 当 Gwitter 成功初始化时解决
示例:
gwitter({
  container: '#comments',
  config: {
    request: {
      token: ['ghp_xxxx', 'xxxx'],
      clientID: 'your_client_id',
      clientSecret: 'your_client_secret',
      owner: 'your_username',
      repo: 'your_repo_name',
      pageSize: 10,
    },
    app: {
      onlyShowOwner: true,
      enableAbout: true,
    }
  }
});
🤝 贡献
欢迎提交 Issue 和 Pull Request!
感谢你的关注与支持!
如果你喜欢这个项目,别忘了点个 ⭐ 哦~
Made with ❤️ by SimonAKing
Extension points exported contracts — how you extend this code
browse all types & interfaces →
Core symbols most depended-on inside this repo
Shape
Languages
Modules by API surface
For agents
$ claude mcp add Gwitter \
  -- python -m otcore.mcp_server <graph>