github.com/Prismer-AI/signet @v0.10.0
Chat with this repoWhat it actually does AI analysis from the code graph — generated when you open this
README
Signet
你的 Agent 跑在别人的基础设施上。证明归你所有。
每次工具调用生成密码学证据 —— 签名、哈希链、可离线验证。独立于任何平台和厂商。







TypeScript 包:
@signet-auth/core ·
@signet-auth/mcp ·
@signet-auth/mcp-server ·
@signet-auth/mcp-tools ·
@signet-auth/node ·
@signet-auth/vercel-ai


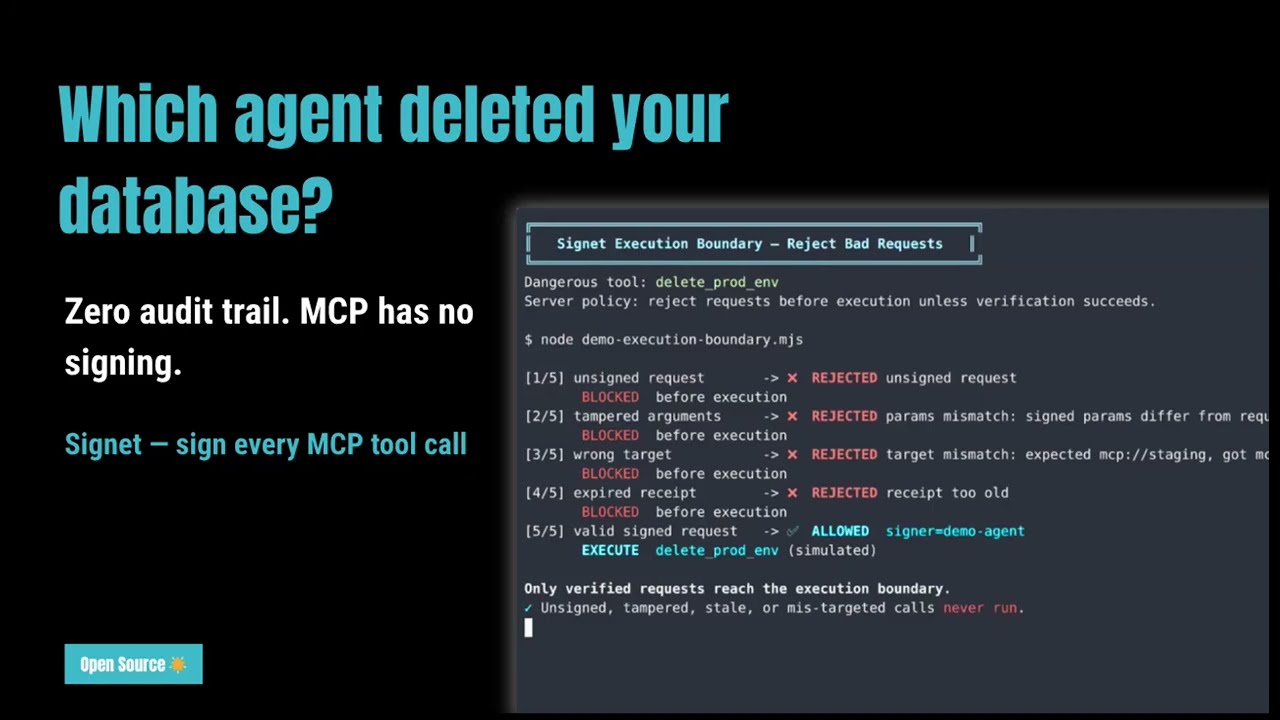
▶ 观看:Signet 如何签名和验证 AI Agent 工具调用(2 分钟)
AI Agent 已经能调用 Bash、GitHub、云 API,甚至支付系统。但大多数团队仍然无法证明:Agent 当时到底发了什么、是谁授权它这么做、以及执行前检查的是哪条策略。
Signet 是 Agent 行为的独立验证层——独立于你的 Agent 所运行的平台,也独立于托管你日志的厂商。
平台记录了发生了什么。Signet 证明它发生了。厂商自己的日志,只有在你信任这个厂商的前提下才算证据。Signet 的签名收据可以被任何人离线验证,无需联系任何人。
如果一次工具调用无法被独立验证,就不应该被无条件信任。 当审计员要求独立证明、当事故发生在你不掌控的基础设施上、或者问题不是"控制台显示了什么"而是"到底发生了什么"时——这个区别至关重要。
每个 Agent 都有自己的 Ed25519 身份。每次工具调用都可以被签名、写入哈希链审计日志、在离线或执行前验证、由服务端联合签名、附带 delegation chain,并在需要时绑定到一条策略决策上。
如果 Signet 对你有帮助,点个 Star 让更多人发现它。
上面的视频展示完整流程。下面这张 SVG 展示 CLI 签名的细节,也可以跳到 看它如何拒绝非法请求 看服务端如何拦住非法请求。

这个 demo 展示签名与审计收据。也可以查看 MCP 流程示意图。

Signet 增加了什么
Signet 为 Agent 行为增加一层轻量但可验证的信任层:
- 签名:用 Agent 的密码学密钥签名每次工具调用
- 验证:在离线或执行边界验证请求,再决定是否信任
- 透明代理:用
signet proxy拦在任意 MCP Server 前面,无需改动 Agent 或 Server 代码 - 联合签名:当你控制服务端时,用双边收据记录"Agent 发了什么"以及"服务端返回了什么"
- 追踪链路:用
trace_id和parent_receipt_id把多步工作流的收据串成因果链 - 授权证明:用 delegation chain 证明是谁授权了这个 Agent
- 策略证明:当 YAML 策略满足时,把签过名的
PolicyAttestation写进收据 - 本地可视化:通过仅追加的审计日志和 dashboard 查看全链路记录,无需托管控制面
0.9 有什么新东西
- MCP 透明代理:
signet proxy --target <cmd> --key <name>— 把 Signet 以 stdio 代理的形式接在任意 MCP Server 前面。Agent 和 Server 无需任何改动。对每个tools/call自动签名,并对 Server 响应生成双边收据。 - 链路追踪:在
Action上新增trace_id和parent_receipt_id字段,把多步工作流中的收据串成因果链。两个字段都纳入签名范围 — 篡改任意一个,签名即失效。 - 策略引擎:
signet sign --policy policy.yaml会在签名前先执行策略检查,并把决策绑定进收据。Proxy 模式同样支持--policy,被拒绝的请求不会到达 Server。 - 委托链:
signet delegate ...生成 v4 收据,证明是谁授权了这个 Agent,以及授予了什么 scope。 - 本地 dashboard:
signet dashboard展示时间线、链完整性、签名健康度,以及 delegated / direct 的分布。 - 更完整的集成面:官方 Claude Code 插件、Codex 插件、MCP 中间件、Python SDK 和 Vercel AI SDK callbacks。
30 秒体验
pip install signet-auth
from signet_auth import SigningAgent

agent = SigningAgent.create("my-agent", owner="team")
receipt = agent.sign("github_create_issue", params={"title": "fix bug"})

assert agent.verify(receipt)
print(receipt.id)
如果你是第一次接触 Signet,建议先从下面五条入口里选一条:
选择你的入口
- Claude Code:最适合最快跑通第一次体验。在 Claude Code 中运行
/plugin install signet@claude-plugins-official。5 分钟后你会得到自动签名的工具调用,以及写入~/.signet/audit/的本地审计日志。 - Codex CLI:最适合给 Codex 的 Bash 工具调用补签名。把
plugins/codex/复制到~/.codex/plugins/signet,再加一个PostToolUsehook。5 分钟后你会得到写入同一条 Signet 审计轨迹的 Codex Bash 行为记录。 - Python SDK:最适合把收据接到 LangGraph、LlamaIndex、OpenAI Agents、CrewAI 或你自己的工具执行器里。先从
SigningAgent.create(...)开始,再按需接入框架 hooks。 - MCP 客户端:最适合你已经控制 MCP client 或 transport 的情况。用
new SigningTransport(inner, secretKey, "my-agent")包住 transport。5 分钟后你会得到带params._meta._signet收据的签名tools/call请求。 - MCP 服务端:最适合你希望在执行前做验证。先在处理函数里调用
verifyRequest(request, {...})。5 分钟后你会得到发生在执行边界的服务端校验:签名者、freshness、target binding,以及 tool/params match。
看它如何拒绝非法请求
运行最短的 execution-boundary demo:
cd examples/mcp-agent
npm run execution-boundary-demo


demo 源码见 examples/mcp-agent/demo-execution-boundary.mjs。
委托链:这个 Agent 是谁授权的?
Signet 收据证明的是 发生了什么。委托链证明的是 谁允许它发生。
一个根身份(人或组织)可以用密码学方式把受限权限委托给 Agent。权限只能收窄,不能放大。Agent 生成的 v4 收据会携带完整的授权证明。
Owner (alice) → Agent A (tools: [Bash, Read], max_depth: 0)
                    ↓
              v4 收据:tool=Bash,authorization.chain 证明 alice → Agent A
# 创建 delegation token
signet delegate create --from alice --to deploy-bot --to-name deploy-bot \
    --tools Bash,Read --targets "mcp://github" --max-depth 0

# 带授权证明签名(v4 收据)
signet delegate sign --key deploy-bot --tool Bash \
    --params '{"cmd":"git pull"}' --target "mcp://github" --chain chain.json

# 验证:签名 + chain + scope + root trust
signet delegate verify-auth receipt.json --trusted-roots alice
或者在 Python 中:
from signet_auth import sign_delegation, sign_authorized, verify_authorized

# delegation API 接收 scope、chain、receipt 的 JSON 字符串
token_json = sign_delegation(root_key_b64, "alice", agent_pubkey_b64, "bot", scope_json)
receipt_json = sign_authorized(agent_key_b64, action_json, "bot", f"[{token_json}]")
scope_json = verify_authorized(receipt_json, [root_pubkey_b64])

策略证明:这次操作当时被允许了吗?
Signet 可以在签名前执行 YAML 策略检查。若动作被允许,签名收据会携带一个 PolicyAttestation,证明当时生效的是哪条策略哈希、命中了哪条规则、最终决策是什么。
version: 1
name: production-agents
default_action: deny
rules:
  - id: allow-read
    match:
      tool: Read
    action: allow
  - id: deny-rm-rf
    match:
      tool: Bash
      params:
        command:
          contains: "rm -rf"
    action: deny
    reason: destructive command
signet policy validate policy.yaml
signet policy check policy.yaml --tool Bash --params '{"command":"rm -rf /"}'

signet sign --key deploy-bot --tool Read \
    --params '{"path":"README.md"}' --target "mcp://github" --policy policy.yaml
被拒绝的动作会在生成收据前直接失败。被允许的动作会产生一个收据,且它的签名 payload 会证明这次策略决策确实发生过。
什么时候该用 Signet
- 你需要为 coding agent、MCP 工具调用或 CI 自动化补上一条防篡改审计轨迹
- 你希望在事故发生后,证明到底是哪个 Agent 发起了哪个动作,以及是谁授权它这么做
- 你需要可离线验证的收据,而不是依赖某个托管平台查看日志
- 你想在签名前做轻量策略检查,但不想额外引入 proxy
Signet 是什么,不是什么
- Signet 是 面向 Agent 行为的信任层:签名、审计、验证、委托链和策略证明
- Signet 是 可以嵌入现有 Agent 栈的 SDK、插件和 MCP 中间件
- Signet 可以 在执行前拒绝未签名、过期、重放或发错目标的 MCP 请求
- Signet 可以 在你提供策略文件时,在签名前直接拒绝动作
- Signet 不是 托管 gateway、常驻控制面,也不是 sandboxing 或最小权限设计的替代品
安装
# CLI
cargo install signet-cli

# Python
pip install signet-auth

# TypeScript(MCP 中间件)
npm install @signet-auth/core @signet-auth/mcp

# TypeScript(MCP 服务端验证)
npm install @signet-auth/mcp-server

# TypeScript(Node 本地审计 / operator helper)
npm install @signet-auth/node

# TypeScript(Vercel AI SDK 中间件)
npm install @signet-auth/vercel-ai

# TypeScript(独立 MCP 签名服务)
npx @signet-auth/mcp-tools
快速开始
Claude Code Plugin
在 Claude Code 中自动签名每次工具调用,零配置:
# 方式 A:从 Anthropic 官方插件市场安装
/plugin install signet@claude-plugins-official

# 方式 B:添加 Signet 作为市场源,然后安装
/plugin marketplace add Prismer-AI/signet
/plugin install signet@signet
每次工具调用都会用 Ed25519 签名,并记录到 ~/.signet/audit/ 的哈希链审计日志中。
其他安装方式:
# 从 Git 安装
claude plugin add --from https://github.com/Prismer-AI/signet

# 通过 signet CLI
signet claude install
Codex Plugin
在 Codex CLI 中自动签名 Bash 工具调用:
git clone https://github.com/Prismer-AI/signet.git
cp -r signet/plugins/codex ~/.codex/plugins/signet
然后在 ~/.codex/hooks.json 中添加 hook:
{
  "hooks": {
    "PostToolUse": [{
      "matcher": "Bash",
      "hooks": [{
        "type": "command",
        "command": "node \"$HOME/.codex/plugins/signet/bin/sign.cjs\"",
        "timeout": 5
      }]
    }]
  }
}
或使用 MCP Server 接入:
codex mcp add signet -- npx @signet-auth/mcp-tools
CLI
# 生成 Agent 身份
signet identity generate --name my-agent

# 签名操作
signet sign --key my-agent --tool "github_create_issue" \
  --params '{"title":"fix bug"}' --target mcp://github.local

# 验证收据
signet verify receipt.json --pubkey my-agent

# 审计最近操作
signet audit --since 24h

# 验证日志完整性
signet verify --chain
MCP 客户端集成(TypeScript)
import { Client } from "@modelcontextprotocol/sdk/client/index.js";
import { StdioClientTransport } from "@modelcontextprotocol/sdk/client/stdio.js";
import { generateKeypair } from "@signet-auth/core";
import { SigningTransport } from "@signet-auth/mcp";

// 生成 Agent 身份
const { secretKey } = generateKeypair();

// 包装任意 MCP transport — 所有工具调用自动签名
const inner = new StdioClientTransport({ command: "my-mcp-server" });
const transport = new SigningTransport(inner, secretKey, "my-agent");

const client = new Client({ name: "my-agent", version: "1.0" }, {});
await client.connect(transport);

// 每次 callTool() 都会被密码学签名
const result = await client.callTool({
  name: "echo",
  arguments: { message: "Hello!" },
});
每次 tools/call 请求会在 params._meta._signet 中注入签名收据。
未接入 Signet 的 MCP Server 也无需修改 —— 未知字段会被忽略。
MCP 服务端验证(TypeScript)
如果你也控制 MCP 服务端,可以在执行前验证请求:
import { verifyRequest } from "@signet-auth/mcp-server";

server.setRequestHandler(CallToolRequestSchema, async (request) => {
  const verified = verifyRequest(request, {
    trustedKeys: ["ed25519:..."],
    maxAge: 300,
  });
  if (!verified.ok) return { content: [{ type: "text", text: verified.error }], isError: true };
  console.log(`验证通过: ${verified.signerName}`);
  // 处理工具调用...
});
参考 MCP Server
这个仓库还包含一个最小可运行的 MCP reference server,用来演示 @signet-auth/mcp-server 的服务端验证:
cd examples/mcp-agent
npm ci
npm run verifier-server
可用工具:
inspect_current_request— 如果当前请求包含params._meta._signet,就验证它verify_receipt— 用公钥验证原始 Signet 收据verify_request_payload— 离线验证一个模拟的 MCPtools/callpayload
环境变量:
SIGNET_TRUSTED_KEYS— 逗号分隔的ed25519:<base64>公钥列表SIGNET_REQUIRE_SIGNATURE—true或false(默认true)SIGNET_REQUIRE_TRUSTED_SIGNER—true或false(默认true)SIGNET_MAX_AGE— 收据最大年龄,单位秒(默认300)SIGNET_EXPECTED_TARGET— 可选的预期receipt.action.target
独立 MCP 签名服务
@signet-auth/mcp-tools 将 Signet 的签名、验证、内容哈希能力暴露成 MCP 工具,可直接接到任何 MCP-compatible client:
npx @signet-auth/mcp-tools
可用工具:signet_generate_keypair、signet_sign、signet_verify、signet_content_hash。
Python SDK(LangChain / CrewAI / AutoGen + 6 more)
pip install signet-auth
from signet_auth import SigningAgent

# 创建 Agent 身份(密钥保存到 ~/.signet/keys/)
agent = SigningAgent.create("my-agent", owner="willamhou")

# 签名任意工具调用 — 收据自动写入审计日志
receipt = agent.sign("github_create_issue", params={"title": "fix bug"})

# 验证
assert agent.verify(receipt)

# 查询审计日志
for record in agent.audit_query(since="24h"):
    print(f"{record.receipt.ts} {record.receipt.action.tool}")
LangChain 集成
from signet_auth import SigningAgent
from signet_auth.langchain import SignetCallbackHandler

agent = SigningAgent("my-agent")
handler = SignetCallbackHandler(agent)

# 每次工具调用自动签名 + 写入审计日志
chain.invoke(input, config={"callbacks": [handler]})

# 也支持异步链
from signet_auth.langchain import AsyncSignetCallbackHandler
CrewAI 集成
from signet_auth import SigningAgent
from signet_auth.crewai import install_hooks

agent = SigningAgent("my-agent")
install_hooks(agent)

# 全局签名所有 CrewAI 工具调用
crew.kickoff()
AutoGen 集成
from signet_auth import SigningAgent
from signet_auth.autogen import signed_tool, sign_tools

agent = SigningAgent("my-agent")

# 包装单个工具
wrapped = signed_tool(tool, agent)

# 或批量包装
wrapped_tools = sign_tools([tool1, tool2], agent)
LangGraph 集成
LangGraph 使用 LangChain 的 callback 系统,同一个 handler 直接可用:
from signet_auth import SigningAgent
from signet_auth.langgraph import SignetCallbackHandler

agent = SigningAgent("my-agent")
handler = SignetCallbackHandler(agent)

result = graph.invoke(input, config={"callbacks": [handler]})
LlamaIndex 集成
```python from signet_auth import SigningAgent from signet_auth.llamaindex import install_handler
agent = SigningAgent("my-agent") handler = install_handler(agent)
所有工具调用事件自动签名
index = ... #
Extension points exported contracts — how you extend this code
Core symbols most depended-on inside this repo
Shape
Languages
Modules by API surface
For agents
$ claude mcp add signet \
  -- python -m otcore.mcp_server <graph>