github.com/FlorianWilhelm/wald-stack-demo @main
Chat with this repoBrowse by type
What it actually does AI analysis from the code graph — generated when you open this
README

WALD: The Modern & Sustainable Analytics Stack
The name WALD-stack stems from the four technologies it is composed of, i.e. a cloud-computing Warehouse like [Snowflake] or [Google BigQuery], the open-source data integration engine [Airbyte], the open-source full-stack BI platform [Lightdash], and the open-source data transformation tool [DBT].
This demonstration projects showcases the WALD-stack in a minimal example. It makes use of the [Kaggle Formula 1 World Championship dataset] and the data warehouse [Snowflake]. To allow the definition of [Python]-based models within [dbt Core] also Snowflake's [Snowpark]-feature is enabled. For analytics and BI we use the graphical BI-tool [Lightdash], which is a suitable addition from the dbt-ecosystem.
The WALD-stack is sustainable since it consists mainly of open-source technologies, however all technologies are also offered as managed cloud services. The data warehouse itself, i.e. [Snowflake] or [Google BigQuery], is the only non-open-source technology in the WALD-stack. In case of Snowflake, only the clients, eg. [snowflake-connector-python] and [snowflake-snowpark-python], are available as open-source software.
To manage the Python environment and dependencies in this demonstration, we make use of [Mambaforge], which is a faster and open-source alternative to [Anaconda].
🎬 Check out the [slides] of the [PyConDE / PyData talk about the WALD Stack].
Getting started
- Setting up the data Warehouse [Snowflake], i.e.:
- [register a 30-day free trial Snowflake account] and choose the standard edition, AWS as cloud provider and any region you want,
- check the Snowflake e-mail for your account-identifier, which is specified by the URL you are given, e.g.
like
https://<account_identifier>.snowflakecomputing.com, - [log into Snowflake's Snowsight UI] using your account-identifier,
-
check if [Snowflake's TPC-H sample database]
SNOWFLAKE_SAMPLE_DATAis available under Data » Databases or create it under Data » Private Sharing » SAMPLE_DATA and name itSNOWFLAKE_SAMPLE_DATA. -
create a new database named
MY_DBwith ownerACCOUNTADMINby clicking Data » Databases » + Database (upper right corner) and enteringMY_DBin the emerging New Database form, -
[activate Snowpark and third-party packages] by clicking on your login name followed by Switch Role » ORGADMIN. Only if ORGADMIN doesn't show in the drop-down menu, go to Worksheets » + Worksheet and execute: ```SQL use role accountadmin;
grant role orgadmin to user YOUR_USERNAME;
`` This should addORGADMINto the list. Now click <kbd>Admin</kbd> » <kbd>Billing</kbd> » <kbd>Terms & Billing</kbd>, and click <kbd>Enable</kbd> next toAnaconda Python packages`. The Anaconda Packages (Preview Feature) dialog opens, and you need to agree to the terms by clicking Acknowledge & Continue. 7. choose a warehouse (which is a compute-cluster in Snowflake-speak) by clicking on Worksheets and selecting Tutorial 1: Sample queries on TPC-H data. Now click on the role button showing ACCOUNTADMIN · No Warehouse on the upper right and select the warehouse COMPUTE_WH or create a new one. Note the name of the warehouse for the dbt setup later, 8. execute all statements from the tutorial worksheet to see if everything was set up correctly. -
Setting up [DBT] and [Snowpark] locally, i.e.:
- clone this repository with
git clone https://github.com/FlorianWilhelm/wald-stack-demo.git, - change into the repository with
cd wald-stack-demo, - make sure you have [Mambaforge] installed,
- set up the mamba/conda environment
wald-stackwith:mamba env create -f environment.yml - activate the environment with
mamba activate wald-stack, - create a directory
~/.dbt/and a fileprofiles.ymlin it, with content:yaml default: outputs: dev: account: your_account-identifier database: MY_DB password: your_password role: accountadmin schema: WALD_STACK_DEMO threads: 1 type: snowflake user: your_username warehouse: COMPUTE_WH target: devand setaccount,passwordas well asuseraccordingly. Note thataccountis the Snowflake Account identifier, e.g.DWABNEV.LRB61572, but the.replaced by-, e.g.DWABNEV-LRB61572. Also check that the value ofwarehousecorresponds to the one you have in Snowflake, -
test that your connection works by running
dbt debugin the directory of this repo. You should see "All checks passed!"-message. -
Setting up [Airbyte] locally, i.e.:
- make sure you have [docker] installed,
- install it with:
commandline git clone https://github.com/airbytehq/airbyte.git cd airbyte docker compose up - check if the front-end comes up at http://localhost:8000 and log in with
username
airbyteand passwordpassword, -
enter some e-mail address and click continue. The main dashboard should show up.
-
Set up [Lightdash] locally, i.e.:
- make sure you have [docker] installed,
- install Lightdash locally by following the [local deployment instructions], i.e.:
commandline cd .. # to leave "wald-stack-demo" if necessary git clone https://github.com/lightdash/lightdash cd lightdash ./scripts/install.sh # and choose "Custom install", enter the path to your dbt project from above - check if the front-end comes up at http://localhost:8080.
- install the
lightdashCLI command following the [how-to-install-the-lightdash-cli] docs. - authenticate the CLI and connect the
wald_stackdbt project by runninglightdash login http://localhost:8080.
Note If you use [Colima] as a Docker alternative, the installation script will fail, caused by the function supposed to start Docker Desktop. A simple fix is to comment out the line calling the
start_dockerfunction (line 417). Be sure that your Docker daemon is already running. Additionally IPv6 is not properly implemented, which results in not being able to authenticate lightdash CLI usinglocalhostas host. Uselightdash login http://127.0.0.1:8080instead to force IPv4.Note If you have improvements for this example, please consider contributing back by creating a pull request. To have it all nice and tidy, please make sure to install & setup [pre-commit], i.e.
pip install pre-commitandpre-commit install, so that all your commits conform automatically to the style guides used in this project.
Demonstration of the WALD-stack
To demonstrate the power of the WALD stack we will:
- ingest a Formula 1 dataset into [Snowflake] using Snowflake's internal capabilities,
- use [Airbyte] to exemplify how external data sources, in our case a csv file with weather information, can be ingested into Snowflake,
- use [dbt] to transform the raw data using SQL and Python leveraging [Snowpark] for data analysis as well as train & predict the position in a race using some simple [Scikit-Learn] model,
- use [Lightdash] to visualise the results and demonstrate its ad-hoc analysis capabilities.
Ingesting the Formula 1 Dataset
To have same data to play around we are going to use the [Kaggle Formula 1 World Championship dataset], which is luckily available on some S3 bucket. To ingest the data into Snowflake, just execute the script [ingest_formula1_from_s3_to_snowflake.sql] within a notebook of the Snowsight UI. Just select all rows and hit the run button.
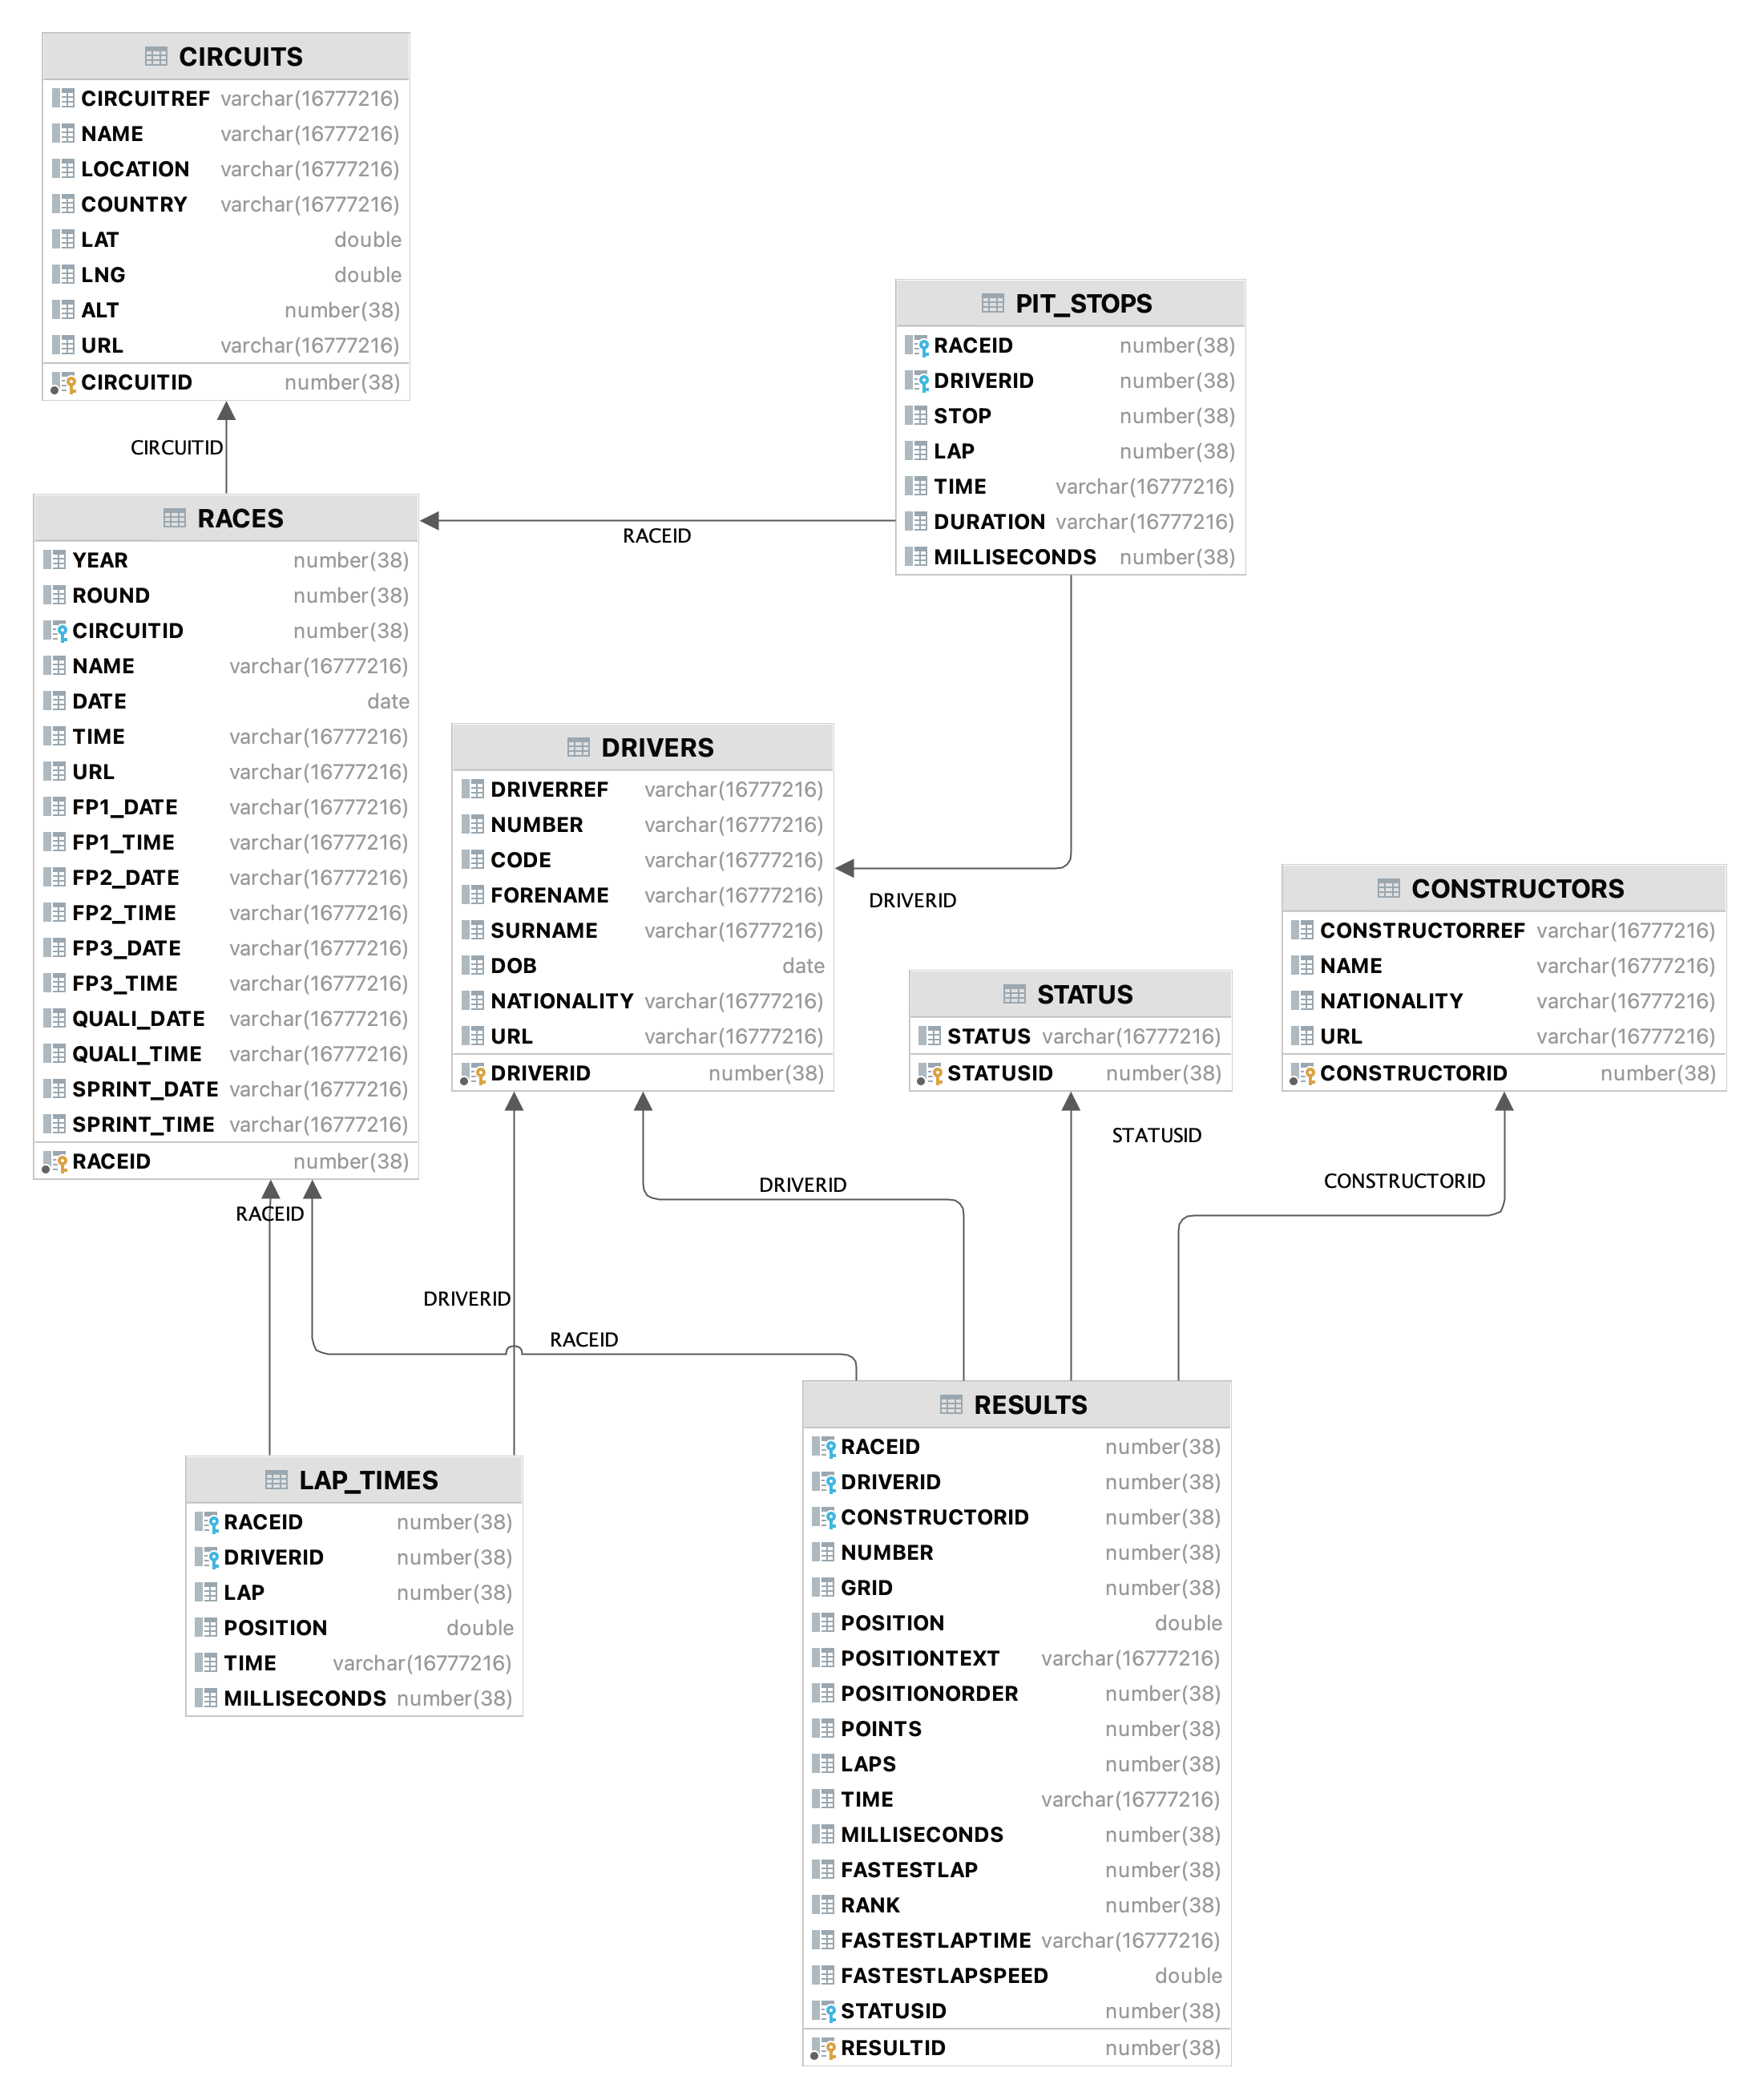
The following figure shows database entities, relationships, and characteristics of the data:
Ingesting the weather data with Airbyte
To get our hands on some data we can ingest into our warehouse, let's take some [weather data from opendatasoft], which
is located in the seeds folder. For Airbyte to find it, we need to copy it into the running Airbyte [docker] container with:
docker cp seeds/cameri_weather.csv airbyte-server:/tmp/workspace/cameri_weather.csv
It is certainly not necessary to point out that this is purely for testing the stack and in a production setting, one would rather choose some S3 bucket or a completely different data source like [Kafka].
Before we start using Airbyte, let's first set up a new database and schema for the data we are about to ingest. Open a notebook in Snowsight and execute:
CREATE DATABASE WEATHER;
USE DATABASE WEATHER;
CREATE SCHEMA RAW;
Let's fire up the Airbyte web UI under http://localhost:8000 where you should see this after having logged in:
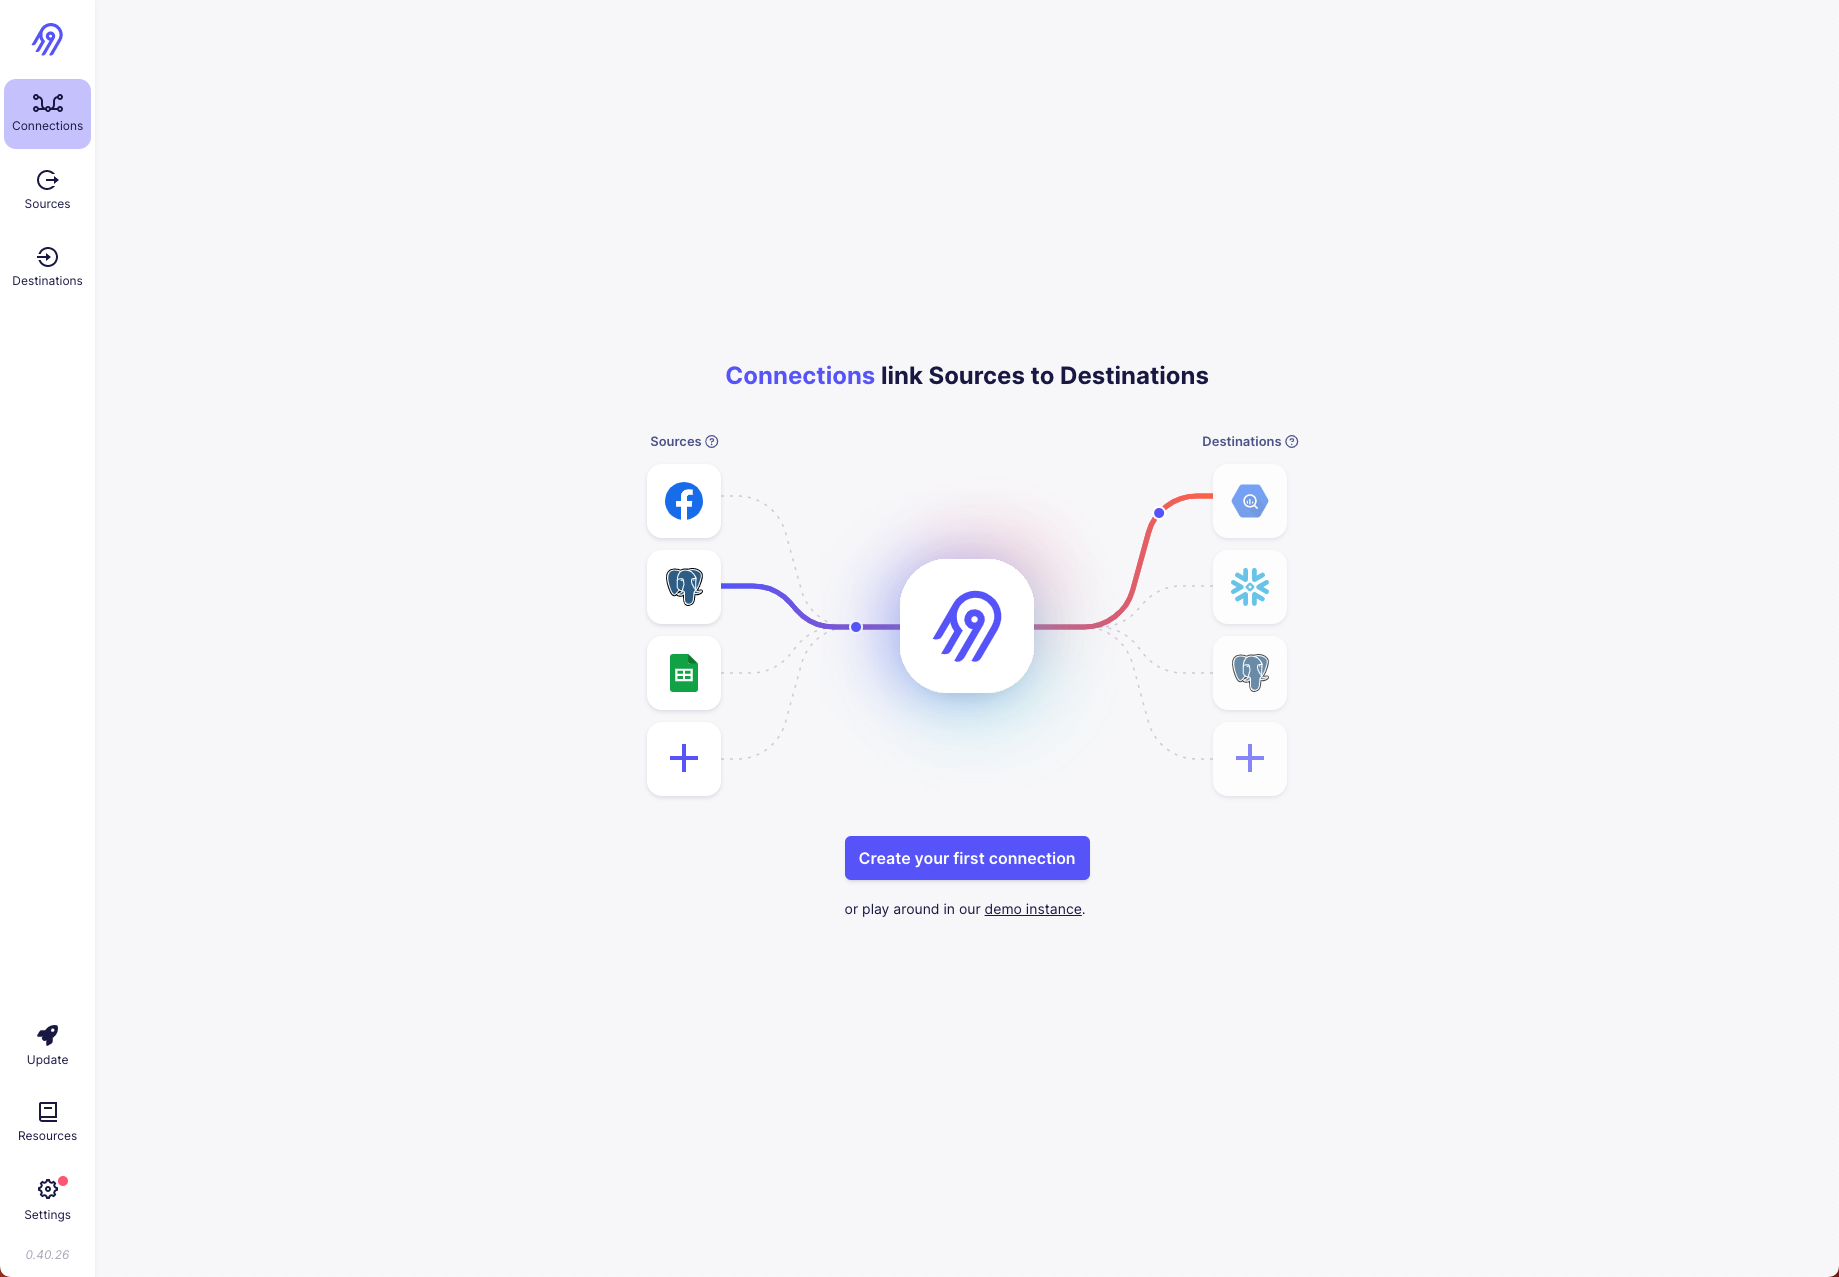
Now click on Create your first connection and select File as source type and fill out the form like this:
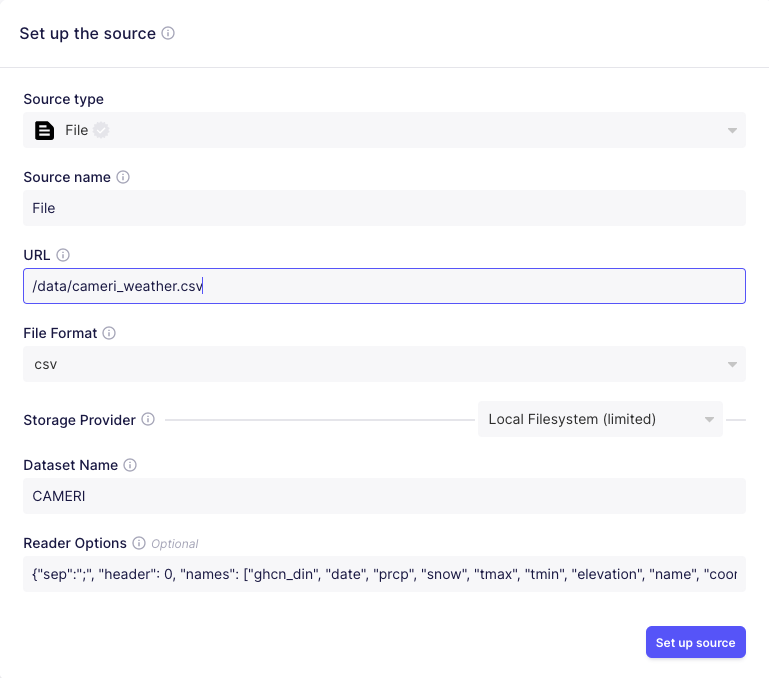
For the Reader Options, just copy & paste the following string:
{"sep":";", "header": 0, "names": ["ghcn_din", "date", "prcp", "snow", "tmax", "tmin", "elevation", "name", "coord", "country_code"]}
Hit Set up Source and select Snowflake in the next form as destination type. No you should see a detailed form
to set up the Snowflake destination. Enter the values like this with the corresponding settings from the Snowflake setup
from above. Remember that the host url follows the schema <account_identifier>.snowflakecomputing.com.
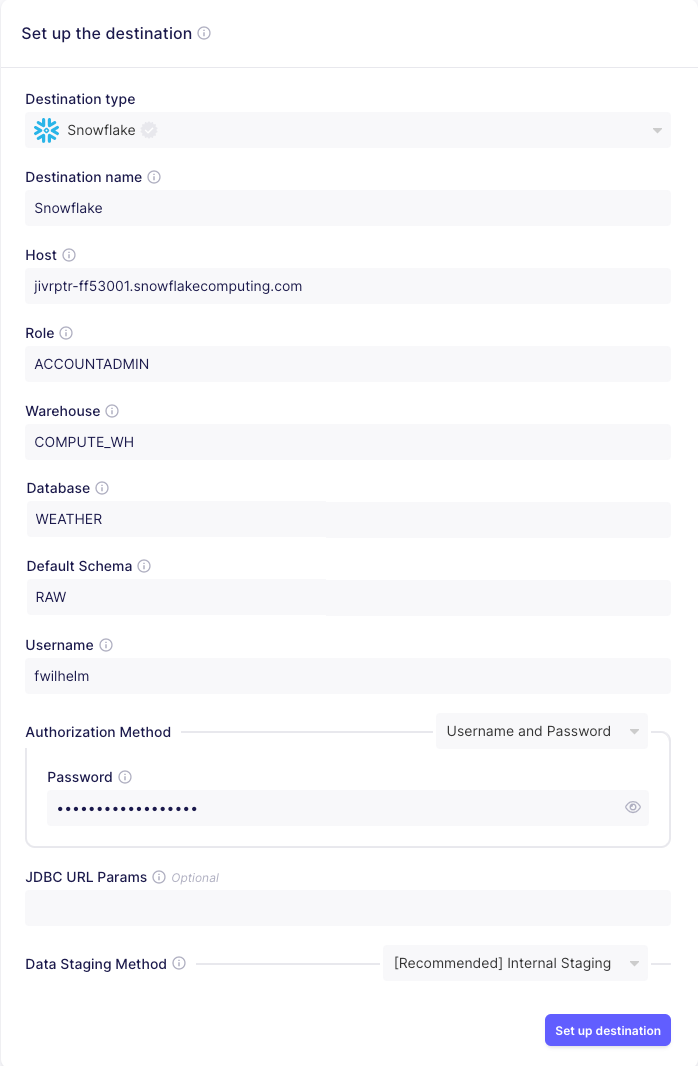
Then hit Set up destination and see a new form popping up. We just stick with the sane defaults provided to us.
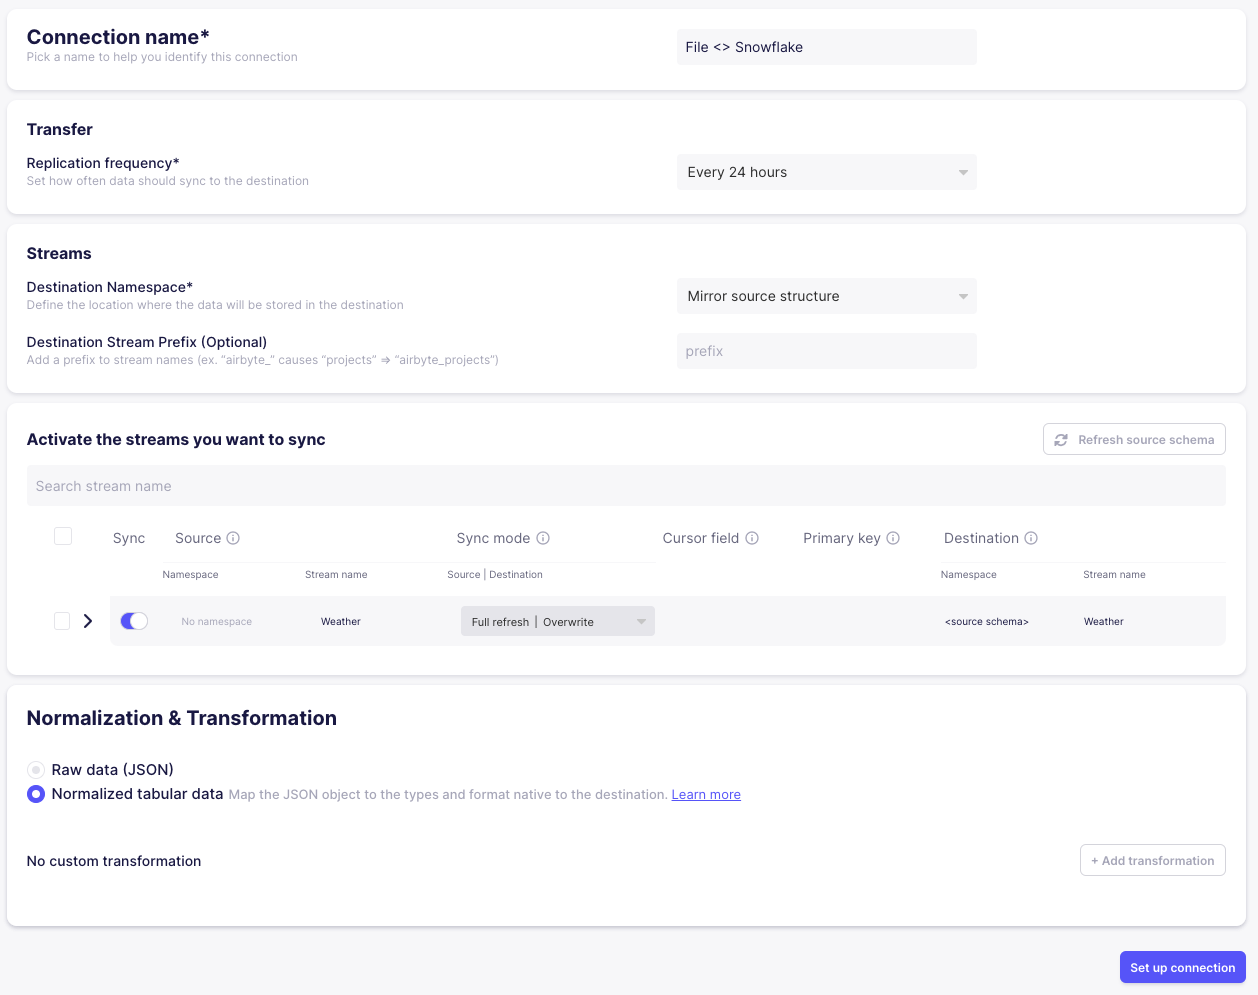
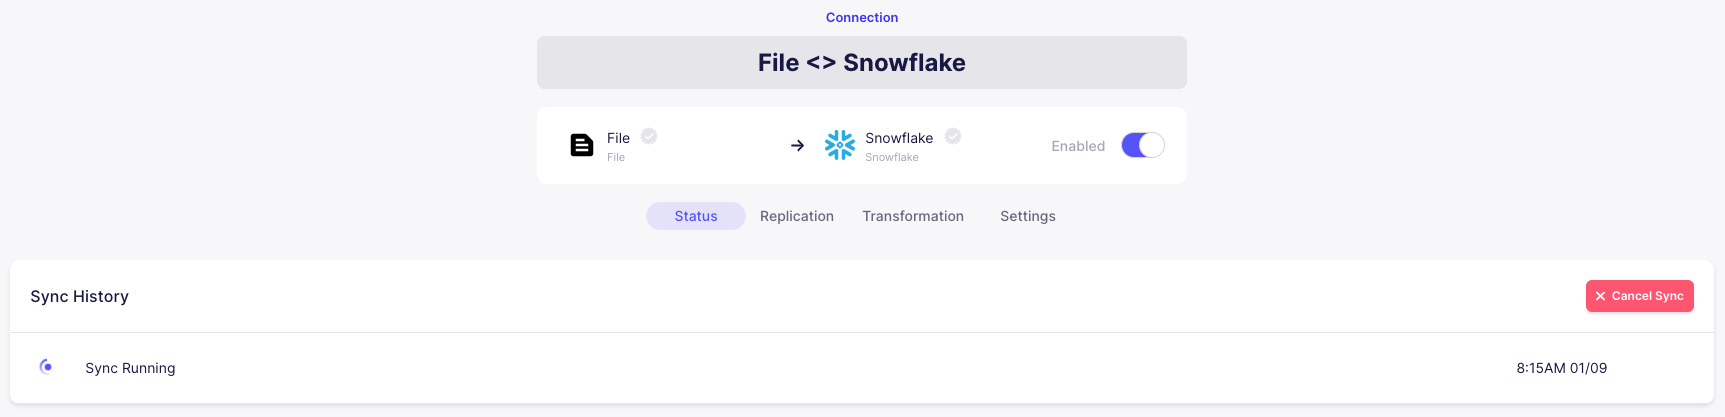
After hitting Set up connection, you should see that Airbyte starts syncing our weather data to Snowflake.
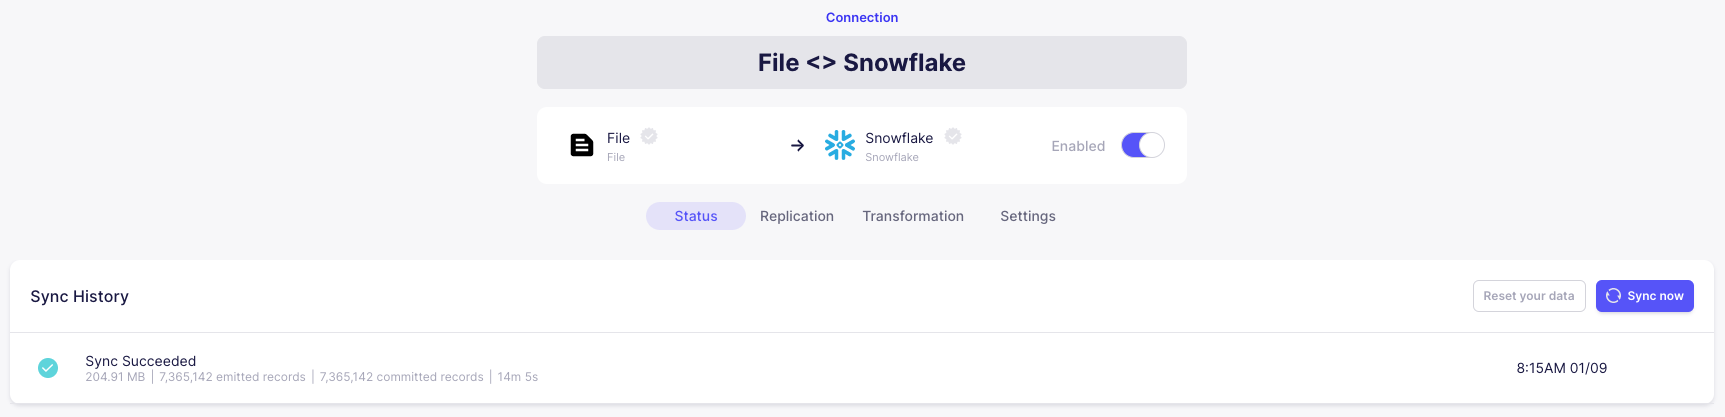
After roughly a minute, the sync should be successfully completed.
Airbyte has a lot more to offer since it has hundreds of sources and destinations for syncing. For our demonstration, however, that is all we need. Note that Airbyte integrates nicely with [dbt] and you can even specify your dbt transformations in Airbyte directly. There is much more to discover here :-) It should also be noted that uploading a simple csv file into Snowflake could also have been done using [dbt's seed] command.
DBT
Since everything is already set up for you in this repository, just don't forget to activate the mamba environment with mamba activate wald-stack before
you run dbt with dbt run in the directory of this repo. You should see an output like this:
```commandline
16:30:55 Running with dbt=1.3.1
16:30:55 Found 22 models, 17 tests, 0 snapshots, 0 analyses, 501 macros, 0 operations, 3 seed files, 9 sources, 0 exposures, 0 metrics
16:30:55
16:30:57 Concurrency: 1 threads (target='dev')
16:30:57
16:30:57 1 of 22 START sql view model WALD_STACK_DEMO.stg_f1_circuits ................... [RUN]
16:30:58 1 of 22 OK created sql view model WALD_STACK_DEMO.stg_f1_circuits .............. [SUCCESS 1 in 0.75s]
16:30:58 2 of 22 START sql view model WALD_STACK_DEMO.stg_f1_constructors ............... [RUN]
16:30:59 2 of 22 OK created sql view model WALD_STACK_DEMO.stg_f1_constructors .......... [SUCCESS 1 in 1.06s]
16:30:59 3 of 22 START sql view model WALD_STACK_DEMO.stg_f1_drivers .................... [RUN]
16:31:00 3 of 22 OK created sql view model WALD_STACK_DEMO.stg_f1_drivers ............... [SUCCESS 1 in 0.75s]
16:31:00 4 of 22 START sql view model WALD_STACK_DEMO.stg_f1_lap_times .................. [RUN]
16:31:00 4 of 22 OK created sql view model WALD_STACK_DEMO.stg_f1_lap_times ............. [SUCCESS 1 in 0.73s]
16:31:00 5 of 22 START sql view model WALD_STACK_DEMO.stg_f1_pit_stops .................. [RUN]
16:31:01 5 of 22 OK created sql view model WALD_STACK_DEMO.stg_f1_pit_stops ............. [SUCCESS 1 in 0.72s]
16:31:01 6 of 22 START sql view model WALD_STACK_DEMO.stg_f1_races ...................... [RUN]
16:31:02 6 of 22 OK created sql view model WALD_STACK_DEMO.stg_f1_races ................. [SUCCESS 1 in 0.77s]
16:31:02 7 of 22 START sql view model WALD_STACK_DEMO.
Core symbols most depended-on inside this repo
Shape
Languages
Modules by API surface
For agents
$ claude mcp add wald-stack-demo \
  -- python -m otcore.mcp_server <graph>