github.com/AbdullahAlfaraj/Auto-Photoshop-StableDiffusion-Plugin @v1.4.1 sqlite
README
Auto-Photoshop-StableDiffusion-Plugin
![]()
With Auto-Photoshop-StableDiffusion-Plugin, you can directly use the capabilities of Automatic1111 Stable Diffusion in Photoshop without switching between programs. This allows you to easily use Stable Diffusion AI in a familiar environment. You can edit your Stable Diffusion image with all your favorite tools and save it right in Photoshop.
Table of Contents
- Auto-Photoshop-StableDiffusion-Plugin
- Table of Contents
- Demo:
- Support Us On Patreon
Support Us On Patreon:
By supporting us on Patreon, you’ll help us continue to develop and improve the Auto-Photoshop-StableDiffusion-Plugin, making it even easier for you to use Stable Diffusion AI in a familiar environment. As a supporter, you’ll have the opportunity to provide feedback and suggestions for future development. Plus, you’ll get early access to new features and tutorials, as well as exclusive art tutorials and tips from a professional artist. We’re passionate about making AI approachable to artists and with your help, we can continue to do just that.
Auto-Photoshop-SD Backers and Sponsors:
💎 Diamond
 |
|||
| Ronny Khalil | zachary | Razvan Matei | MasterAI |
🥇 Gold
| Alex | Olivier Lefebvre | Arthur Liu | Florin-Alexandru Ilinescu | Zenko | Juan Pablo Mendiola | Robin Edwards | Frederic Dreuilhe |
| Danny Sahagun | darius coal | Kerwin | The Dread Vixen Alinsa | Bruce Hunter | Chris Canterbury | Lawrence L Tran | Jake Skokan |
| que0005 | Xavier Matia Bernasconi | Mats Oldin | Rodrigo Terra | Nicolas Meunier | Ihor Pankin |
🥈 Silver
| Amith Thomas | xiao yuan | Ezra Blake | Kevin Schofield | Mvs Srs | Felipe Cortes | Smith | Sanchez |
| Ziui Witter |
🥉 Copper
| Sebastian Karbowniczek | Petter Lundh | AWWalker | cdmusic | Jason Bessonette | 22two |

How To Install:
Use method 1 or 2 if you are an Artist use method 3 if you are a Developer/Programmer
Method 1: One Click Installer
1) Download the .ccx file 2) run the ccx file . that's all. you will be able to use all of stable diffusion modes (txt2img, img2img, inpainting and outpainting), check the tutorials section to master the tool.
3) (Don't skip) Install the Auto-Photoshop-SD Extension from Automatic1111 extension tab. The extension will allow you to use mask expansion and mask blur, which are necessary for achieving good results when outpainting and inpainting.
- a) Copy Auto-Photoshop plugin url
- b) Paste the url in auto1111's extension tab and click install

- c) Make sure the Auto-Photoshop plugin is listed, then click "Apply and Restart UI"
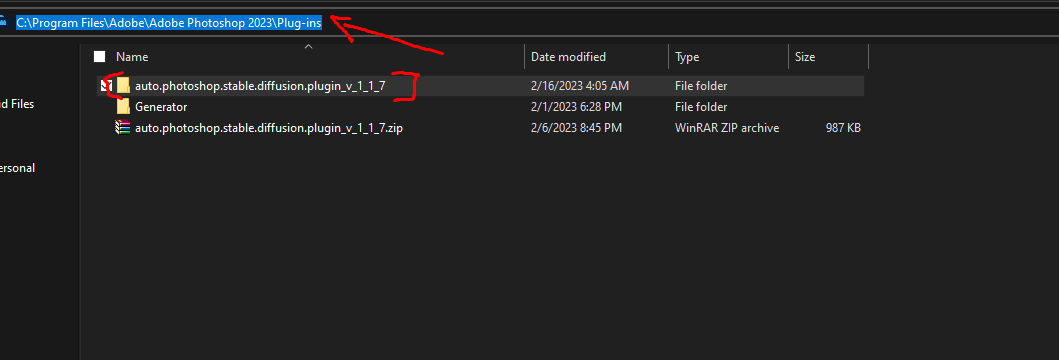
Method 2: The Unzip Method
1) Download the .zip file
2) Unzip it in a folder with the same name
3) move the unzipped folder to the Photoshop Plugin folder
4) (Don't skip) Install the Auto-Photoshop-SD Extension from Automatic1111 extension tab. The extension will allow you to use mask expansion and mask blur, which are necessary for achieving good results when outpainting and inpainting.
- a) Copy Auto-Photoshop plugin url
Method 3: The UXP method (Instruction for Developers):
For artists we recommend you use the one click installer. If you are a developer Watch the any of these videos or follow the instruction bellow.

For artists we recommend you use the one click installer
First time running the plugin (local Automatic1111):
1) download the plugin:
git clone https://github.com/AbdullahAlfaraj/Auto-Photoshop-StableDiffusion-Plugin.git
2) open cmd window in the "Auto-Photoshop-StableDiffusion-Plugin" directory and then install the dependencies by typing:
npm install
3) build the plugin by transpiling typescript to javascript:
npm run watch
4) run "start_server.bat" inside "Auto-Photoshop-StableDiffusion-Plugin" directory 5) go to where you have automatic1111 installed. Edit the "webui-user.bat" in automatic1111 change this line
set COMMANDLINE_ARGS=
to
set COMMANDLINE_ARGS= --api
that will allow the plugin to communicate with the automatic1111 project. After saving close the "webui-user.bat" file and run it normally.
6) run photoshop. go to edit -> prefrences -> plugins 1) make sure you check "Enable Developer Mode" checkbox 7) install "Adobe UXP Developer Tool" from here Installation (adobe.com) this tool will add the plugin into photoshop 8) run Adobe UXP Developer Tool and click on "Add Plugin" button in the top right. Navigate to where you have "Auto-Photoshop-StableDiffusion-Plugin" folder and open "manifest.json" 9) select the plugin and click on Actions -> Load Selected
Extension points exported contracts — how you extend this code
GlobalStore (Interface)Core symbols most depended-on inside this repo
LocaleShape
Languages
Modules by API surface
Dependencies from manifests, versioned
For agents
$ claude mcp add Auto-Photoshop-StableDiffusion-Plugin \
  -- python -m otcore.mcp_server <graph>