github.com/codealong-dev/ride-sharing @main
Chat with this repoWhat it actually does AI analysis from the code graph — generated when you open this
README
"Microservices with Go" course project
Get the starter code here!
In this project‑driven course, you’ll build the backend microservices system for a Uber‑style ride‑sharing app from the ground up—using Go, Docker, and Kubernetes.
By the end, you’ll have a fully deployed, horizontally scalable ride‑sharing system that’s ready for real traffic. Plus, you’ll walk away with reusable template for building future distributed projects—accelerating your path to become a lead engineer.
Check it out at: https://www.selfmadeengineer.com/

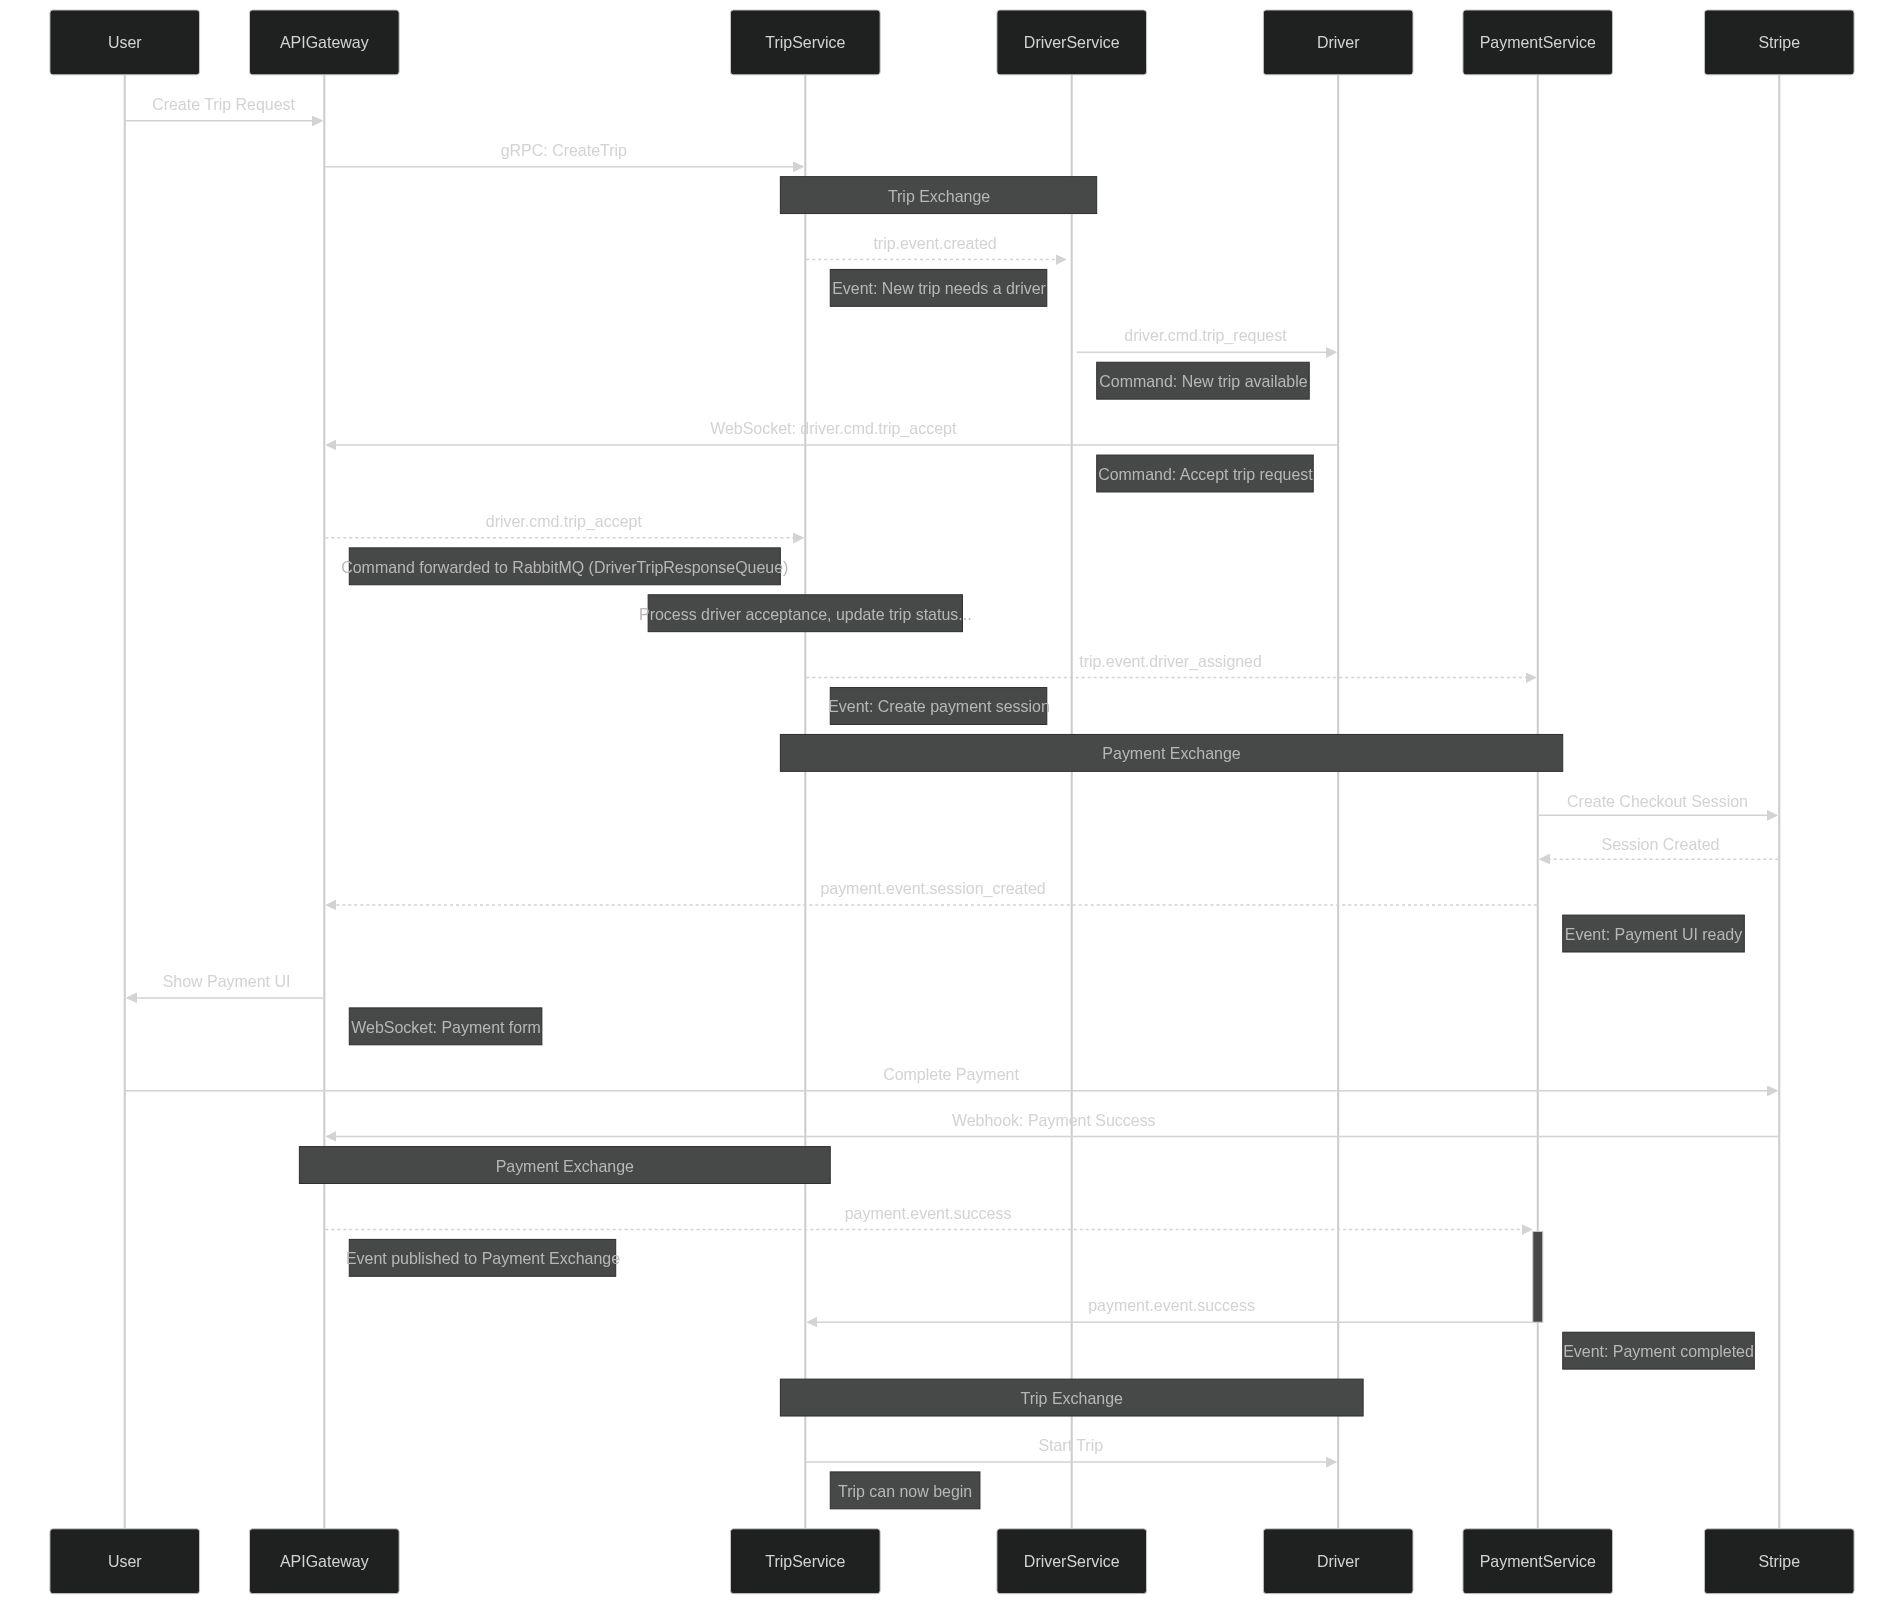
Trip Scheduling Flow
Installation
The project requires a couple tools to run, most of which are part of many developer's toolchains.
- Docker
- Go
- Tilt
- A local Kubernetes cluster
MacOS
-
Install Homebrew from Homebrew's official website
-
Install Docker for Desktop from Docker's official website
-
Install Minikube from Minikube's official website
-
Install Tilt from Tilt's official website
-
Install Go on MacOS using Homebrew:
brew install go
- Make sure kubectl is installed.
Windows (WSL)
This is a step by step guide to install Go on Windows using WSL. You can either install via WSL (recommended) or using powershell (not covered, but similar to WSL).
-
Install WSL for Windows from Microsoft's official website
-
Install Docker for Windows from Docker's official website
-
Install Minikube from Minikube's official website
-
Install Tilt from Tilt's official website
-
Install Go on Windows using WSL:
# 1. Get the Go binary
wget https://dl.google.com/go/go1.23.0.linux-amd64.tar.gz

# 2. Extract the tarball
sudo tar -xvf go1.23.0.linux-amd64.tar.gz

# 3. Move the extracted folder to /usr/local
sudo mv go /usr/local

# 4. Add Go to PATH (following the steps from the video)
cd ~
explorer.exe .

# Open .bashrc file and add following lines at the bottom and save the file.
export GOROOT=/usr/local/go
export GOPATH=$HOME/go
export PATH=$GOPATH/bin:$GOROOT/bin:$PATH

# 5. Verify the installation
go version
- Make sure kubectl is installed.
Run
tilt up
Monitor
kubectl get pods
or
minikube dashboard
Deployment (Google Cloud example)
It's advisable to first run the steps manually and then build a proper CI/CD flow according to your infrastructure.
0. Environments
REGION: europe-west1 # change according to your location
PROJECT_ID: <your-gcp-project-id>
1. Add secrets.yaml file to the production folder
Production folder needs to contain a secrets.yaml for the production environment, you can just copy secrets from the development folder for now.
2. Build Docker Images
Build all docker images and tag them accordingly to push to Artifact Registry.
# Build the Api gateway
docker build -t {REGION}-docker.pkg.dev/{PROJECT_ID}/ride-sharing/api-gateway:latest --platform linux/amd64 -f infra/production/docker/api-gateway.Dockerfile .

# Build the Driver service
docker build -t {REGION}-docker.pkg.dev/{PROJECT_ID}/ride-sharing/driver-service:latest --platform linux/amd64 -f infra/production/docker/driver-service.Dockerfile .

# Build the Trip service
docker build -t {REGION}-docker.pkg.dev/{PROJECT_ID}/ride-sharing/trip-service:latest --platform linux/amd64 -f infra/production/docker/trip-service.Dockerfile .

# Build the Payment service
docker build -t {REGION}-docker.pkg.dev/{PROJECT_ID}/ride-sharing/payment-service:latest --platform linux/amd64 -f infra/production/docker/payment-service.Dockerfile .
3. Create a Artifact Registry repository
Go to Google Cloud > Artifact Registry and manually create a docker repository to host your project images.
4. Push the Docker images to artifact registry
Docker push the images.
If you get errors pushing:
1. Make sure to gcloud login, select the right project or even gcloud init.
2. Configure artifact on your docker config gcloud auth configure-docker {REGION}-docker.pkg.dev Docs
5. Create a Google Kubernetes Cluster
You can either run a gcloud command to start a GKE cluster or manually create a cluster on the UI (recommended).
6. Update manifests files
Connect to your remote cluster and apply the kubernetes manifests.
gcloud container clusters get-credentials ride-sharing --region {REGION}--project {PROJECT_ID}
Next, upload each manifest by hand to make sure the correct order is maintained.
# First, apply the app-config and secrets
kubectl apply -f infra/production/k8s/app-config.yaml
kubectl apply -f infra/production/k8s/secrets.yaml

# Jaeger
kubectl apply -f infra/production/k8s/jaeger-deployment.yaml

# RabbitMQ
kubectl apply -f infra/production/k8s/rabbitmq-deployment.yaml

# Wait for both Jaeger and RabbitMQ to be running successfully

# Then, apply the services
kubectl apply -f infra/production/k8s/api-gateway-deployment.yaml
# Wait until the API is up and then do the next and so on...
kubectl apply -f infra/production/k8s/driver-service-deployment.yaml
kubectl apply -f infra/production/k8s/trip-service-deployment.yaml
kubectl apply -f infra/production/k8s/payment-service-deployment.yaml
If you need to redeploy you can use the same command above or just kubectl apply -f infra/production/k8s
Sometimes pods might need to be deleted for new ones to be deployed.
kubectl get pods
kubectl delete pod <pod-name>

# or for all deployments
kubectl rollout restart deployment
7. Enjoy!
Get the External IP from the api-gateway
kubectl get services
Go back to locally developing your project by changing kubernetes context
kubectl config get-contexts

# For Docker Desktop
kubectl config use-context docker-desktop

# OR for Minikube
kubectl config use-context minikube
Adding HTTPS to your API
- Reserve a static IP in GCP: Go to the Google Cloud Console → VPC Network → External IP addresses. Click "RESERVE STATIC ADDRESS". Name it api-gateway-ip (to match your annotation). Choose the same region as your GKE cluster (or "global" if using a global Ingress).
Confirm your IP exists:
gcloud compute addresses list
- Add the ingress deployment
- Change from LoadBalancer to ClusterIP
- Apply the config
kubectl apply -f infra/production/k8s/api-gateway-ingress.yaml
kubectl apply -f infra/production/k8s/api-gateway-deployment.yaml
- Get the IP address:
kubectl get ingress api-gateway-ingress
You should also wait for SSL certificate to be provisioned. Check the status:
kubectl describe managedcertificate api-gateway-cert
Once the certificate is provisioned (you'll see a "Provisioning" status change to "Active")
- The Ingress will automatically provision a Google-managed SSL certificate for the IP address. You can access your API using:
https://<IP_ADDRESS>
Note: Since this is using a self-signed certificate, browsers will show a security warning. This is normal and expected. You can: Accept the warning in your browser (not recommended for production) Use a proper domain name (recommended for production)
Extension points exported contracts — how you extend this code
TripRepository (Interface)Core symbols most depended-on inside this repo
GetStringShape
Languages
Modules by API surface
Datastores touched
For agents
$ claude mcp add ride-sharing \
  -- python -m otcore.mcp_server <graph>